Introduction
This set of guides describes the functions available in the Huggins Yamaha Inventory Program. If you are new to the Huggins program, simple menus with keyboard “shortcuts” help make navigation quick and easy. If you are upgrading the Huggins program, this version is similar to previous versions but with improvements to help manage your parts inventory. To navigate through this file press PAGE UP and PAGE DOWN on the keyboard, use the elevator buttons on the right side of the window, or click the hyperlinks that appear throughout the document.
This file explains the screens and menu choices available and consists of two sections: A User’s Guide and a Reference Guide. The User’s Guide covers common topics often asked about how to use the program. The Reference Guide provides detailed information about the programs functionality, covering each option in detail.
If this set of guides does not address your questions or if you have recommendations to enhance the program, contact Huggins technical support. Feedback from the dealer network has helped make the Huggins Yamaha Inventory program the best product on the market to help manage your inventory and make your business more profitable.
User’s Guide
Click on the following topics to learn about the Huggins Yamaha Inventory Program.
Setup
Installing the Huggins Yamaha Inventory Program
Accessing the program setup options
Changing the Default Filenames Used
Changing the name displayed on the main screen
How To
Search for a part number not stocked
Setup a custom pricing formula
Add parts to an existing pick list
Set the MIN and MAX inventory to the current quantity on hand
Set the Average Cost to the current Yamaha Marine cost
Change the Average Cost from $0.00 to the current Yamaha Marine cost
Change the Average Cost from $0.00 to $0.01
Rotate all YTD sales history back one year
Reset all part numbers on hand back to 0
Purchase Orders
Creating a Yamaha Marine Business System compatible Purchase Order
Sending a purchase order to theYamaha Marine Business System
Editing a Purchase Order before checking it in
Price Book
Generate a price book for all parts
Generate a detailed listing of all parts
Generate a listing of the inventory dollar value
Generate a listing of the inventory replacement value
Calculate the value of current inventory
Reports For
Parts stocked but out of inventory
Parts stocked and in inventory
Parts stocked but not sold this year
Parts stocked that had sales in the current year
Parts out of stock and had no sales for the current year
Parts out of stock but had sales for the current year
Parts in stock but had no sales for the current year
Parts in stock and had sales for the current year
Setup
Installing the Huggins Yamaha Inventory Program
Installation for a single computer as well as networked and multiple computers is described in the Reference Guide.
Accessing the Program Setup Options
Users can access the program setup options by clicking the F9 = SET button on the screen, by pressing the F9 key on the keyboard, or by the File \ Setup menu option. For security purposes, you must enter the program PASSWORD to make changes to the program configuration.
Changing the Password
For security purposes, users must know the existing program PASSWORD in order to change the program PASSWORD. Additional information on changing the password is in the Reference Guide.
Changing the Default Filenames Used
To make changes to the default program filenames use the program Setup menu. Do not change the default filenames without first seeking advice from Huggins technical support.
Changing the Printer Port
To make changes to the default printer port use the Setup menu and enter the new port in the Printer Name field. The program creates all reports in the Search Results field on the main screen for viewing. Print reports by first exporting the file to Notepad by clicking on File\ Export Current Display to Notepad. The results of the search will display in a Windows Notepad window. Then save the Notepad information by giving it a file name, or print the information to a printer.
Changing the Name Displayed on the Main Screen
To change the company name displayed on the main screen, go to the Setup menu. In the “Company Name:” field enter the new name to display on the screen.
Loading Existing Inventory
Loading the existing inventory into the Huggins Yamaha Inventory Program in an accurate manner is critical so that the program manages the inventory properly. Many dealers choose to take a physical inventory of their existing parts before starting this task, while others choose to use an existing inventory record, such as a card file or inventory report from another computer program. Please evaluate the accuracy of any existing information before relying on it as the source for setting up your inventory in the Huggins program.
When converting from another computer program Huggins technical support might be able to convert your existing inventory data into the new program. Please contact technical support for advice and pricing.
To begin loading part number inventory:
1. Launch the Huggins program from the desktop icon. Then turn on the Show Details option by clicking the F8=COST button on the main screen or by simply pressing the F8 key on the keyboard.
2. Type the part number in the Enter part number to search field and press Enter. If the part number is in the database, several columns of information will display including: Status code, the Part Number followed by a Description and a package count if there are more than one in a package, and a Price.
3. Select the F1=EDIT button on the screen or press the F1 key on the keyboard to display the Edit Part Information dialog box. Enter information in the following fileds: BIN, QTY, YTD, INFO, Y1-Y9 history, AVG COST, MIN, & MAX. Move to the next field by pressing ENTER, TAB, or by simply clicking the mouse in the field. Once the information is entered, select the SAVE button to store the information.
Repeat these steps for each part number to enter into inventory.
Contacting Technical Support
For questions, upgrades, or troubleshooting, contact Huggins technical support by telephone or e-mail.
How To
Search for a Part Number
To search for a part number, simply type the part number in the Enter part number to search field and press ENTER. The program will search for the part number requested.
Search for a Part Number Not Stocked
Enter the part number into the Enter part number to search field and press ENTER. The program will search through the Yamaha Marine parts database and return information on the part found on the main screen. There are a few rules to follow when entering Yamaha part numbers:
1. Dashes are optional for entering part numbers for searching. The program will automatically:
· Insert dashes according to Yamaha part number rules
· Add zeros to the part number entered to form the Yamaha part number
2. There are two configurations of Yamaha part numbers:
XXX-XXXXX-XX-XX or 9XXXX-XXXXX-XX
Two examples of these are:
65W-13437-42-00 and 93626-08210-00
If you enter part number: 65W-134
The program will understand it as: 65W-13400-00-00
If you enter part number: 9362608210
The program will understand it as: 93626-08210-00
There are no spaces in any Yamaha part number so if any spaces are included, anything typed after the space will be ignored.
For example, if you type: 93626 08210
The program will understand it as: 93626-00000-00
Setup a Custom Pricing Formula
In today’s challenging business environment, many dealers implement custom pricing to make them more profitable or competitive. Custom pricing is implemented through the program Setup screen, and then selecting the Custom Price Setup tab.
Use Common Pricing Strategies
For information on Custom Pricing Strategies refer to the Reference Guide.
Take a Part Out of Inventory
Enter the part number into the Enter part number to search field and press ENTER. Select the F5=OUT button on the screen or press the F5 key on the keyboard. This DECREASES the QTY field by one and INCREASES the YTD field by one. To remove more than one part from stock, click or press F5 multiple times or use F1 to enter the new quantity. In either case, the YTD field will automatically be increased by the amount the QTY field is decreased.
Note: The Point of Sale Program available from Huggins Outboard Computer Programs will generate invoices and decrease stock quantities with each sale made. This is a good alternative to manually updating the quantity of a part each time one is sold.
Return a Part to Inventory
Enter the part number into the Enter part number to search field and press Enter. Select the F6=IN button on the screen or press the F6 key on the keyboard. Clicking or pressing the F6 key INCREASES the QTY field by one and recalculates the AVG COST field. This is a quick way to add a part to stock. To add more than one part to stock, press F6 multiple times or use F1 to enter the new quantity. In either case, the AVG COST field will recalculate automatically the new current cost.
Delete a Part from Inventory
Enter the part number into the Enter part number to search field and press Enter. Select the F1=EDIT button on the screen or press the F1 key on the keyboard to open the Edit Part Information dialog box. Select the “Delete This Part” button located in the lower right corner. Additional information on deleting parts is available in the Reference Guide.
Use the “Close Fit” Screen
Entering a part number that is not a valid Yamaha Marine part number will display the Close Fit Screen. This screen displays all parts that begin with the number entered. For more information see the Reference Guide.
Create a New Pick List
To create a new Pick List select File \ “Start a new Pick List with the Current Part.” This will delete any existing Pick List and start a new one. The current part is displayed as item 1 on the new list. Additional information on creating a Pick List is in the Reference Guide.
Add Parts to an Existing Pick List
To add more parts to an existing Pick List, enter the new part number in the Enter part number to search field. Press enter and then select the F2=LIST button on the screen or press the F2 key on the keyboard. Additional information on adding parts to a Pick List is in the Reference Guide.
Set the MIN and MAX Inventory to the Current Quantity on Hand
To set the MIN and MAX inventory levels select the Reports menu and then go to 4. Utilities and select 1. Set all Min’s and Max’s to the current QTY. Additional information on this is in the Reference Guide.
Set the Average Cost to the Current Yamaha Marine Cost
To set the average cost, select the Reports menu and then go to 4. Utilities and then select 2. Set all Avg Cost to the current cost. Additional information on this is in the Reference Guide.
Change the Average Cost from $0.00 to the Current Yamaha Marine Cost
To change the average cost, select the Reports menu and go to 4. Utilities and then select 3. Set all Avg cost that are 0 to current cost. Additional information on this is in the Reference Guide.
Change the Average Cost from $0.00 to $0.01
To change the average cost, select the Reports menu and go to 4. Utilities and then select 4. Set all AVG cost that are 0 to 0.01 utility. Additional information on this is in the Reference Guide.
Rotate all YTD Sales History Back One Year
End of year stock reports are run by selecting the Reports menu and going to 3. Stock Reports and Price Books. Then select 6. End of Year Processing to reset YTD. If end of year reports are run inadvertently or more than once, they can be reversed. To do so and rotate YTD sales back one year, go to the Reports menu and go to 4. Utilities and then select 5. Rotate YTD Y-1, Y-2, etc. Backwards. Additional information on this is in the Reference Guide.
Reset all Part Numbers on Hand Back to 0
To reset the QTY field for each part number back to 0, select the Reports menu and go to 4. Utilities and then select 6. Set all QTY fields back to 0. Additional information on this is in the Reference Guide.
Backup the Inventory Database
Back up the Inventory Database at least once a week. Additional information on how to back up inventory data is in the Reference Guide.
Purchase Order
Creating a Yamaha Marine Business System Compatible Purchase Order
Before generating a Yamaha Marine Business System Compatible Purchase Order, create a Suggested Reorder Report. Once the Suggested Reorder Report reflects the parts to order, launch the Build Yamaha Marine Business System Compatible Purchase Order report by either pressing both the CTRL and the B key together (CTRL +B) on the keyboard, or via the Reports menu then go to 1.Purchase Orders and then 3. Build Yamaha Marine Business System Compatible Purchase Order. Import and transmit the Purchase Order to theYamaha Marine Business System website.
Sending a Purchase Order to the Yamaha Marine Business System
Purchase orders created by the Huggins program can be sent to Yamaha Marine via the Yamaha Marine Business System Communications website. See the Reference Guide for details.
Editing a Purchase Order before Checking It in
Dealers often receive incomplete orders when parts are backordered or shipped from alternate locations. Before checking in a Purchase Order, edit the Purchase Order to reflect items that are backordered and are not included with the shipment. Do this by creating the Edit Purchase Orders for Backorders report by pressing both the CTRL and the E key (CTRL+E) on the keyboard, or by selecting the Reports menu and 1. Purchase Orders and go to 4. Edit Purchase order for backorders. Additional information on editing purchase orders is in the Reference Guide.
Checking in a Purchase Order
Check in a Purchase Order by selecting the Reports menu and 1. Purchase Orders and go to 5. Check in Purchase Order. Additional information on checking in purchase orders is in the Reference Guide.
Deleting a Purchase Order
Delete a Purchase Order by selecting the Reports menu and 1. Purchase Orders and go to 6. Delete Purchase Order. Additional information on deleting purchase orders is in the Reference Guide.
Price Book
Generate a Price Book for all Parts
To generate a price book for all parts, select the Reports menu and 3. Stock Reports and Price Books and go to 1. Price book of all parts in stock. Additional information on generating a price book is in the Reference Guide.
Generate a Detailed Listing of all Parts
To generate a price book with inventory part details, select the Reports menu and 3. Stock Reports and Price Books and go to 2. Price book with all Inventory details. Additional information on generating a price book is in the Reference Guide.
Generate a Listing of the Inventory Dollar Value
To generate a price book with dollar value, select the Reports menu and 3. Stock Reports and Price Books and go to 3. Price book showing average cost. Additional information on generating a price book is in the Reference Guide.
Generate a Listing of the Inventory Replacement Value
To generate a price book with replacement value, select the Reports menu and 3. Stock Reports and Price Books and go to 4. Price book showing replacement cost. Additional information on generating a price book is in the Reference Guide.
Calculate the Value of Current Inventory
To generate a price book value of current inventory, select the Reports menu and 3. Stock Reports and Price Books and go to 5. Calculate value of current inventory. Additional information on generating a price book is in the Reference Guide.
Perform Year End Processing
Year End processing is performed on an annual basis to close the current year. To reset YTD data, select the Reports menu and 3. Stock Reports and Price Books and go to 6. End of year processing to reset YTD. Additional information on end of year processing is in the Reference Guide.
Reports For
Low Stock
There is an option to set a MIN quantity desired for each part number in stock. The program can generate a Low Stock listing for all part numbers with a QTY count less than the MIN value.
To generate a low stock listing, select the Reports menu and 1. Purchase Orders and go to 1. Low Stock Report. The listing will include all parts that on order as well as parts that need to be ordered. Additional information on low stock reports is in the Reference Guide.
Suggested Reorders
To generate a suggested reorder report, select the Reports menu and 1. Purchase Orders and go to 2. Suggested Reorder Report. A shortcut to get this report is to press CTRL and the S key together (CTRL + S) on the keyboard. Sometimes the report contains parts that you do not want ordered. In this case adjust the MIN quantity of each part number in question by double-clicking the part number. The Edit Part Information dialog box will display. Adjust the MIN quantity and then run the Suggested Reorder Report again. Additonal information on reorders is in the Reference Guide.
Parts on Order
To determine the parts on order, select the Reports menu and 1. Purchase Orders and go to 7. Parts on Order. Additional information on this report is in the Reference Guide.
Parts Stocked but Out of Inventory
To determine stocked parts that are out of inventory, select the Reports menu and 2. Quantity and YTD subset reports and go to 1. Parts with zero Quantity. Additional information on this report is in the Reference Guide.
Parts Stocked and In Inventory
To determine stocked parts that are in inventory, select the Reports menu and 2. Quantity and YTD subset reports and go to 2. Parts with Quantity. Additional information on this report is in the Reference Guide.
Parts Stocked but Not Sold this Year
To determine stocked parts that are not sold, select the Reports menu and 2. Quantity and YTD subset reports and go to 3. Parts with zero YTD. Additional information on this report is in the Reference Guide.
Parts Stocked that had Sales in the Current Year
To determine stocked parts that had sales, select the Reports menu and 2. Quantity and YTD subset reports and go to 4. Parts with YTD. Additional information on this report is in the Reference Guide.
Parts Out of Stock and had No Sales for the Current Year
To determine stocked parts that had no sales, select the Reports menu and 2. Quantity and YTD subset reports and go to 5. Parts with zero Quantity and zero YTD. Additional information on this report is in the Reference Guide.
Parts Out of Stock but Had Sales for the Current Year
To determine out of stock parts that had sales, select the Reports menu and 2. Quantity and YTD subset reports and go to 6. Parts with zero Quantity and non zero YTD. Additional information on this report is in the Reference Guide.
Parts in Stock but had No Sales for the Current Year
To determine stocked parts that had no sales, select the Reports menu and 2. Quantity and YTD subset reports and go to 7. Parts with non-zero Quantity and zero YTD. Additional information on this report is in the Reference Guide.
Parts In Stock and Had Sales for the Current Year
To determine stocked parts that had sales, select the Reports menu and 2. Quantity and YTD subset reports and go to 8. Parts with non-zero Quantity and non-zero YTD. Additional information on this report is in the Reference Guide.
Taking Physical Inventory
The program has a report that is useful when taking physical inventory. It lists the parts in the database sorted by bin location. Print this report once with quantities included and once without quantities. Take the physical inventory with the paper copy that does not include quantities. Count each bin and write in the actual quantity for each part number on the blank quantity field. Then compare the quantities found in the bin versus what is in the software database. Update the program database where needed.
To generate this report select the Reports menu and 5. Stock Database Utilities and go to 9. Sort by Bin Location. Additional information on this report is in the Reference Guide.
Reference Guide
Administration
Network or Multiple Computer Configurations
Part Number Search Screen
Part Number Search Screen with Details
Pricing Information and Time and Date Stamp
Min\ Max\ QTY on Order\ PO\ Order Information
File Menu
Export Current Display to Notepad
Start a new Pick List with Current Part
Add Current Part to Pick List [F2]
View Menu
Details Includes 9 Years History
Details Includes Min/Max Reorder Line
Automatic Font Size Adjustment
Reports Menu
2. Suggested Reorder Report (CTRL + S)
3. Build Yamaha Marine Business System Purchase Order (CTRL + B)
4. Edit Purchase Order for Backorders (CTRL + E)
5. Parts with zero Quantity and zero YTD
6. Parts with zero Quantity and non-zero YTD
7. Parts with non-zero Quantity and zero YTD
8. Parts with non-zero Quantity and non-zero YTD
1. Price book of all parts in stock
2. Price book with all Inventory Details
3. Price book showing average cost
4. Price book showing replacement cost
5. Calculate Value of Current Inventory
6. End of Year Processing to reset YTD (Close Year)
7. Price book of Priced Parts Only
8. Price book of Superceded Parts Only
9. Price book of Obsolete parts Only
1. Set all Min’s and Max’s to current QTY
2. Set all Avg Cost to current cost
3. Set all Avg cost that are 0 to current cost
4. Set all Avg cost that are 0 to 0.01
5. Rotate YTD, Y-1, Y-2, etc. backwards
6. Set all QTY fields back to 0
8. Rebuild Reverse Supercede database
8. Search Descriptions for a Word
0. Import Stock Data from Excel
8. Search Description for a Word
Aftermarket Database Utilities
Pictures Menu
Help Menu
Huggins on the Web (hugginsweb.com)
Support Web Site (www.hug911.com)
Administration
Installation Instructions
The software from Huggins Outboard Computer Programs runs on MS Windows operating systems and is available in several formats including CDs, USB flash drives, and downloads from the web. Our goal is to make the installation process as simple as possible. If updating an existing Huggins program, consult Huggins technical support for installation instructions.
Single Computer Configuration
Note: The default (standard) installation location on a single computer for the Huggins software is in the following directory:
C:\Huggins
This configuration is encouraged to simplify installation of future price updates, program upgrades, assistance from Huggins technical support, and to insure the functionality with other existing Huggins software as well as software provided by Yamaha Marine. If another directory is used, please contact Huggins technical support to update your customer records for future reference and support.
CD Installation
To install the Huggins Yamaha Inventory Program from a CD:
1. Load the CD into the computer CD-ROM drive. The installation program should start automatically.
2. If
not, from the computer START menu, type in the search box D:\SETUP to launch
the installation process.
Note: If the CD drive letter is not D:\, substitute the appropriate
letter.
3. Once the installation begins, follow the instructions to complete the installation.
USB Flash Drive Installation
To install the Huggins Yamaha Inventory Program from a USB Flash Drive:
1. Insert the Flash Drive into a USB port on the computer. An AutoPlay popup box should display.
2. Select “Open folder to view files.” The Windows File Manager should open.
3. Doubleclick on the file name SETUP to launch the installation process.
4. Once the installation begins, follow the instructions to complete the installation.
Web Download Installation
To install the Huggins Yamaha Inventory Program from a download file:
1. Locate the recent download files in the Internet browser.
a. If using Google Chrome, select the orange striped square in the top right corner and click on “Downloads” or press Ctrl + J on the keyboard.
b. If using MS Internet Explorer, select Tools from the menu bar and click on “View downloads” or press Ctrl + J on the keyboard.
c. If using Mozilla Firefox, select the down arrow from the menu bar and click on “Show all downloads.”
2. Doubleclick on the “install.exe” file downloaded from Huggins.
3. Once the installation begins, follow the instructions to complete the installation.
Network or Multiple Computer Configurations
The Huggins Yamaha Inventory Program is available in network or multiple computer configurations. For the network version, the installation software will have two installation choices: one to install the software on the server and the other to install the software on the client computers. After selecting the proper choice for the installation, follow the on screen instructions to complete the installation.
Note: The default installation location for client computers in a network environment requires the use of a mapped H:\Huggins drive. Configure all client computers with an H:\Huggins drive prior to installation of the program.
If needed, support is available from Huggins technical support for a fee.
Special Network Information
For network installs or when the C:\Huggins directory is not used, the system setup is different. See the Setup screen information for details.
Note: This program uses wait locking for critical reports and no wait locking for specific parts access. This support maintains the integrity of parts data even though multiple workstations can have access to the same data files.
Backing Up Inventory Data
Backing up inventory data is a critical step in maintaining the computer system. Many labor hours invested in maintaining the inventory system is a valuable assest that needs protection. Power failures, hard drive crashes, and human errors do happen and cost the dealership money. Develop a routine for backing up all data to ensure a plan is in place for “when” something happens.
Dealers often ask – “How often should I be doing a backup”? There is no generic answer. It depends partly on how often the data is used and the time and money invested. A good rule of thumb is at a minimum, backup data once a week. Another method would be to backup at the end or beginning of each day. Thus, if all the transactions are lost and need to be reconstructed, there will be less work to do. In addition, store backups somewhere besides on the hard drive. Use another computer hard drive, CD, USB flash drive, or cloud storage. It is highly recommended the backup be tested on another system to learn how to restore a backup. Thus, when a failure occurs, you will have experience performing a backup.
You can also arrange with Huggins technical support to backup files for off site archival.
To perform a backup of Inventory Data, perform the following:
1. Make sure all users have “closed” the Huggins Yamaha Inventory Program on all computers.
2. Insert the backup device.
3. Double click on “Stockfile Backup” located in the Huggins folder.
4. Press any key on the keyboard to begin the backup.
5. Once completed, a screen will display the allstock.zip file and the time and date of backup.
6. Press any key to return to the desktop.
Store backup files in a safe and secure location. Make a copy of the backup to store at an offsite location in the event of a flood or fire.
Note: The backup procedure backs up Inventory Data only. If you use removable media and wish to backup the entire Huggins program, consult your network administrator or Huggins technical support for alternate backup configurations.
Contact Information:
Mailing Address
Huggins Outboard Computer Programs, Inc.
7524 S Tanglewild Drive
Raleigh, NC 27613
Phone Numbers
Phone: (919) 787-1836
Fax: (919) 787-1890
E-Mail Address
support@hugginsweb.com
Or click this link to send an E-Mail message: support@hugginsweb.com.
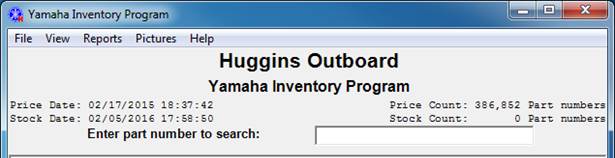
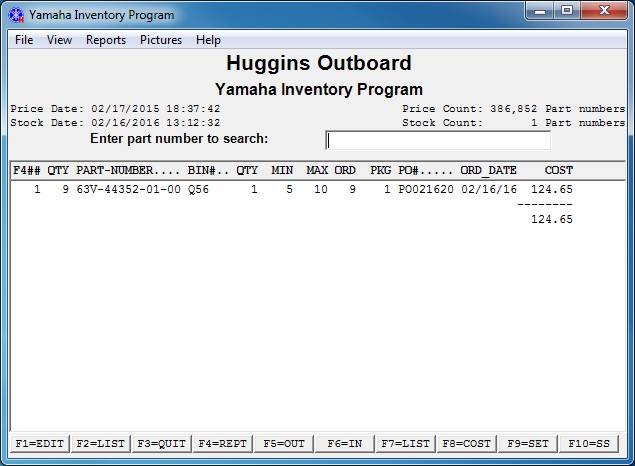
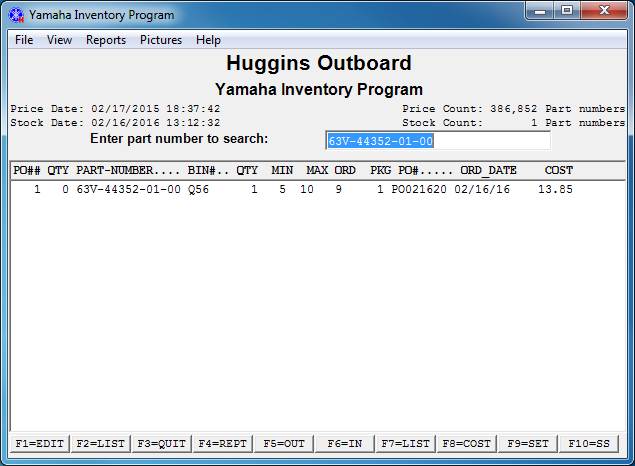
Part Number Search Screen
Part Number Search Screen (No Number Entered)
The first screen that appears in the Huggins Yamaha Inventory Program is the Part Number Search Screen. In the Title Bar at the top are the program icon and program name: Yamaha Inventory Program.
Note: This icon appears in the Windows task bar when the program is minimized.
The command line is below the Title Bar and includes drop down menus for the following functions: File, View, Reports, Pictures, and Help. Clicking on the command drops down menus, or use keyboard shortcuts: ALT+F, ALT+V, ALT+R, ALT+P, and ALT+H.
The first line displays the dealership name that can be edited on the Setup menu.
The second line contains the name of the program: Yamaha Inventory Program.
The third line has a search box labeled “Enter part number to search.” This is the most commonly used box to obtain information.
The forth line is called the “Heading” line. It contains abbreviations, part numbers, and descriptive titles for the data contained in the Yamaha database. The following sections describe the Heading fields.
COD = Yamaha Code
The COD field contains the 3-digit Yamaha code.
S = Status Code
S = A superseded part number
> = Fast moving part
Blank = All other parts
X’s = Part Number
The Part Number field contains the part number of the item searched. If unexpected results occur after a search, double-check this field to see if the part number entered is correct.
DESCRIPTION
The DESCRIPTION field contains up to 20 characters provided by Yamaha to describe the part.
C = Category
Yamaha assigned categories include:
A= Fast selling item
B= Moderate selling item
C= Slow selling item
D= Very slow moving item
E= No movement
N= Fast selling item added to the price file this year
O= Moderate selling item added to the price file this year
P= Slow selling item added to the price file this year
Q= Very slow moving item added to the price file this year
PACK
The PACK field indicates how many of the same part are packaged together in an order.
PRICE
The PRICE field indicates the “dealership list price.” If a custom price formula is used, this is the value shown. If the part number searched is superseded or no longer available from Yamaha, this information appears in this field.
BIN
The BIN field identifies where the part is located in your stock room. This data must be added to the program for each part in inventory or the field displays as blank.
QTY
The QTY field identifies the current quantity on hand for the part searched. Quantity will only be displayed for parts entered in the stock file.
YTD
The YTD field is the Year-To-Date quantity of this part in stock sold so far this year. When the QTY field is decreased the YTD field is increased automatically. At the end of each year, a special report moves the YTD count for each part into history and zeroes this field. Refer to the End of Year Processing to reset YTD report for more information.
Search Results
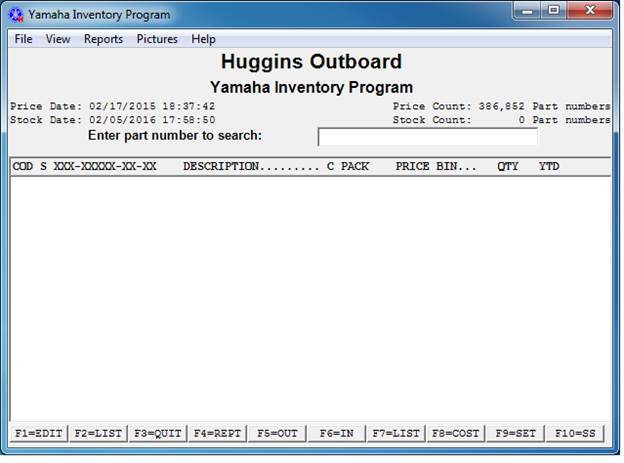
The white space in the center of the program screen will display the database results for the part number searched.
Function Keys
The bottom of the program window contains a series of buttons that correspond to the following functions:
F1=EDIT
Selecting the F1 button on the screen or pressing the F1 key on the keyboard will open the “Edit Yamaha Part Information” dialog box.
F2=LIST
Selecting the F2 button on the screen or pressing the F2 key on the keyboard will add the current part number to a Pick List in progress. Refer to the instructions on how to start a new Pick List.
F3=QUIT
Selecting the F3 button on the screen or pressing the F3 key on the keyboard exits the Huggins program.
F4=REPT (Reports)
Selecting the F4 button on the screen or pressing the F4 key on the keyboard opens the Reports Menu.
F5=OUT
Selecting the F5 button on the screen or pressing the F5 key on the keyboard decreases the QTY field by one and increases the YTD field count by one. This is a quick way to remove a part from stock. To remove more than one part from stock, click or press F5 more than once or use F1=EDIT to manually enter the new quantity. In either case, the YTD field is automatically increased by the amount the QTY is decreased.
The F5 key updates the TIME & DATE stamp in the part record, as does any change to the part record.
Note: If F5 is pressed accidently or the count did not seem to change, check the TIME & DATE stamp by selecting F8 to enter Details mode. If the TIME & DATE are current, then F5 was pressed. To check if F5 was pushed twice, either check a recent inventory report or count the parts in the actual bin.
To avoid this problem, before pressing F5 check the quantity field and double check that it decreased the proper amount. If the quantity is zero, the program allows you to decrease the quantity into negative numbers. This is so you can sell a part in stock on a larger subassembly or its component parts and then later add it back when reordered to make the count come out right.
The Huggins Point of Sale Program will generate invoices and decrease stock quantities with each sale made. This other program is a good alternative to manually updating the quantity of a part each time one is sold.
The F5 key can be password protected in order to prevent unauthorized users from removing parts from inventory. Additional details to set this up are in the Security section.
F6=IN
Selecting the F6 button on the screen or pressing the F6 key on the keyboard increases the QTY field by one and recalculates the AVG COST field. This is a quick way to add a part to stock. To add more than one part to stock, press or click F6 more than once or use F1=EDIT to manually enter the new quantity. In either case, the AVG COST field automatically recalculates based on the current cost. The F6 key updates the TIME & DATE stamp in the part record, as does any change to the part record.
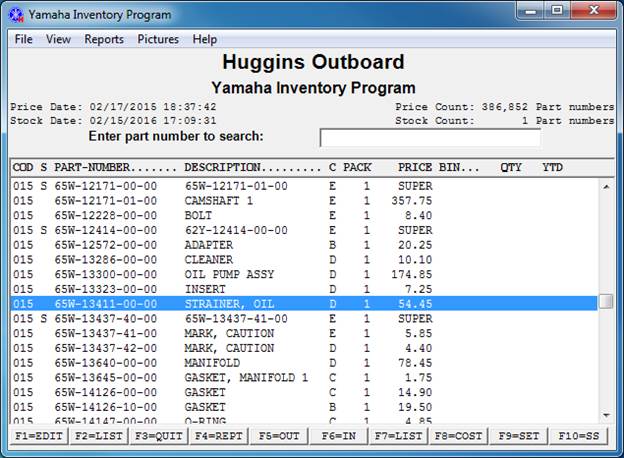
F7=LIST
Selecting the F7 button on the screen or pressing the F7 key on the keyboard produces a listing of the entire parts inventory in numerical order. This screen report can be printed by exporting the file to Notepad.
F8=COST
Selecting the F8 button on the screen or pressing the F8 key on the keyboard turns the Details view on or off. The Program default option is details off but this can be changed in the View menu.
F9=SET (Setup)
Selecting the F9 button on the screen or pressing the F9 key on the keyboard displays the program Setup options.
F10=SS (Supersede)
Selecting the F10 button on the screen or pressing the F10 key on the keyboard allows stocking the newest part available from Yamaha. A superseded number may still be available in inventory. Select the F10 button to “drill down” one level at a time. Continue selecting F10 to reach the stocked number in the supersede chain. This feature is a time-saver for finding superseded parts listed in an older service manual or microfiche library.
For example, a Crank Cylinder Assy with part number 64X-W0090-00-8P is superseded 3 times as follows:
Searching for part number 64X-W0090-00-8P
shows it superseded to 65V-W0090-00-8P
which supersedes to 65V-W0090-01-8P
which supersedes to 65V-W0090-01-8S.
Part Number Search Screen with Details
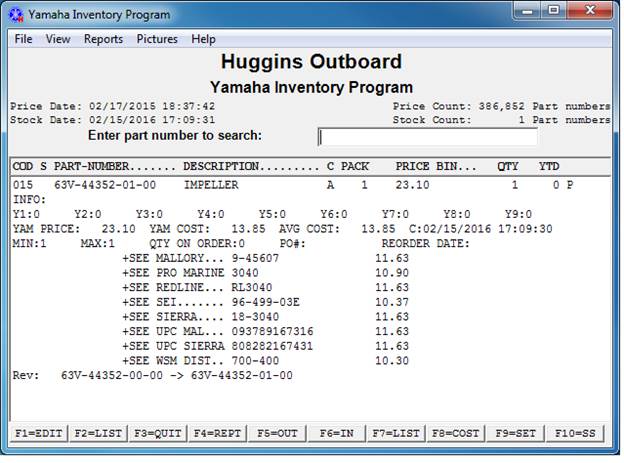
Part Number Search Screen with Details
To display four additional lines of detail select the F8=Cost button or F8 key on the keyboard. To toggle off these details, select the F8 button or F8 key on the keyboard again. Another method is to check the option Show Details [F8=Cost] on the View menu.
INFO
The first detail line is an information line that adds additional information about the part. This line is not displayed when Show Details is turned off.
YTD History
The second detail line is the year-to-date history for the last nine years. The Y1 field contains the year-to-date count for last year. The Y2 field contains the year-to-date count for 2 years ago, etc. In order to maintain accurate YTD part counts, you must close out each year on an annual basis. Refer to the End of Year Processing section for more details on closing out the year.
Pricing Information and Time and Date Stamp
The third detail line is the pricing information for the part searched, as well as a time and date stamp. The YAM PRICE is the Yamaha suggested selling price (printed in the Yamaha Marine price book). If you are using a custom price formula, the YAM PRICE displayed is different from the book value. The AVG COST is your average cost for this part from purchase orders. The time and date stamp indicates the last time the part record changed.
Min\ Max\ QTY on Order\ PO#\ Order Date Information
The fourth detail line is the minimum and maximum parts desired, the quantity on order, the purchase order number, and the reorder date. These fields are defined in the Edit Part Information screen.
Close Fit Screen
Close Fit Screen
If an unknown part number is entered, the Close Fit screen will display a series of part numbers that are close to the number typed. In the example pictured above, the part number 65W-134 was entered. That is not a valid Yamaha part number. The close fit screen highlights the closest valid part number 65W-13411-00-00 and the other part numbers higher and lower than the one entered. This is very helpful if only part of an existing number is known or if a part number is entered incorrectly.
Note: Dashes are optional when entering a part number. The program will automatically format part numbers with the proper number of dashes.
File Menu
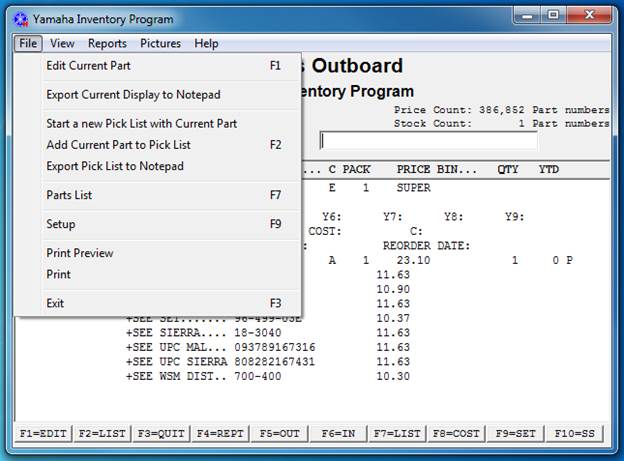
The File menu deals with the overall program operations such as setup, exporting, printing, and exiting. Keyboard shortcuts are also available to expedite funtions and usage.
Edit Current Part [F1]
Before using the program for inventory control, enter the part information. Do this via the Edit Yamaha Part Information screen available from the File menu, selecting the F1=EDIT button, or by pressing the F1 key on the keyboard. First enter the part number to be added and then provide details about the part such as storage location, quantiy on hand, sales history, and pricing data. The following paragraphs describe each field available and the information needed.
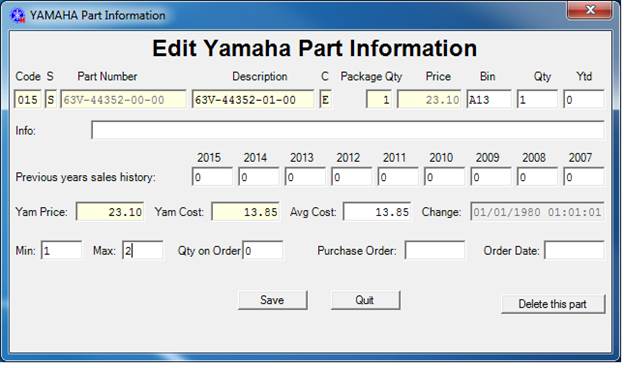
Edit Part Information Screen
Bin
The location where this part is stored in your stockroom – can be up to 6 characters. Example: A13
Qty
The current quantity of parts on hand. Example: 1
Ytd
The number of this part number sold this year to date.
Info:
Detailed information about this part that displays when details is on. Enter up to 75 characters. Example: “There are more of these in the storage trailer”
Previous years sales history:
Enter the sales history for up to 9 years. In each field enter the quantity of this part number sold. If no data is available, the program will automatically enter this information each year going forward when you close the YTD sales.
Yam Price:
The current List price for the part as published by Yamaha Marine. (Your retail price may differ if custom pricing is used).
Yam Cost:
The current Cost price as published by Yamaha Marine.
Avg Cost:
Your average cost for the part. Average cost is computed from the quantity on hand and the amount paid for each one.
Change:
The last date and time when information was entered or changed for the part.
Min:
The minimum quantity to keep in stock before reordering. Example: (We never want to have less than 1 on hand.)
Max:
The maximum quantity to have in stock after reording. Example: (We never want to have more than 10 on hand.)
Qty on Order:
The quantity that is currently on order from Yahama Marine. Purchase orders processed by the Huggins program will display the quantity on order in this field.
Purchase Order:
The number in this field is the purchase order entered in the Huggins program that includes this part number.
Order Date:
The date of the purchase order entered in the Huggins program that includes this part number.
Save and Quit Buttons
Select the “Save” button to store the information entered for the part. Select “Quit” to abandon any changes made.
Delete this Part Button
To delete a part from the inventory including all historical information, select the “Delete this part” button. The following warning prompt will ask for confirmation.
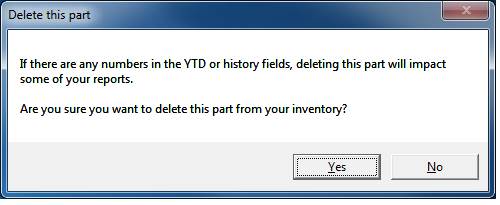
Delete Current Part Warning
Select “Yes” to delete the part and adjust inventory totals or “No” to ignore this request.
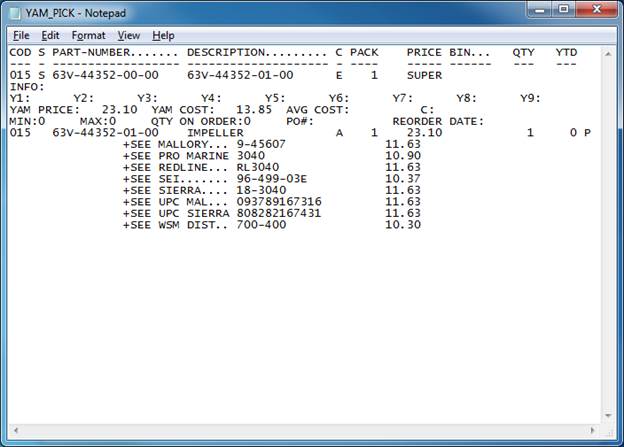
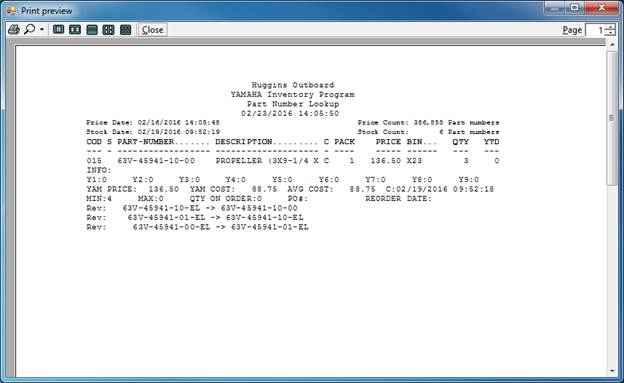
Export Current Display to Notepad

Sample File of Exported Search to Notepad
Export the information in the results screen by selecting Export Current Display to Notepad from the File menu. Use the Notepad application included with your operating system to save the information to a file or send it to a printer.
Start a New Pick List with Current Part
To create a new pick list select “Start a new Pick List with Current Part” from the File menu. The pick list will include the part number displayed on the screen as the first item. A confirmation box will ask if you want to proceed. If so, select “Yes” or “No” to cancel this action.

Pick List Confirmation
Add Current Part to Pick List [F2]
To add additional parts to an existing Pick List, select “Add Current Part to Pick List” from the File menu. A shortcut to do this is available by pressing the F2 key on the keyboard or selecting the F2=LIST button on the screen.
Export Pick List to Notepad
Sample File of Pick List Exported to Notepad (with Details)
To export the Pick List to a Notepad file, selec “Export Pick List to Notepad” from the File menu. From Notepad the Pick List information can be saved to a file or sent to a printer.
Note: When creating Pick Lists, the list will include detailed data for each part if F8=Cost is on.
Parts List [F7]
To create a list of all parts in inventory sorted by part number, select either “Parts List” from the File Menu, select the F7=LIST button on the screen, or press the F7 key on the keyboard. To print this parts list, select “Print Preview” or “Print” from the File menu. To save this list, select “Export Current Display to Notepad” from the File menu. Then, save the file with Notepad.
Setup [F9]
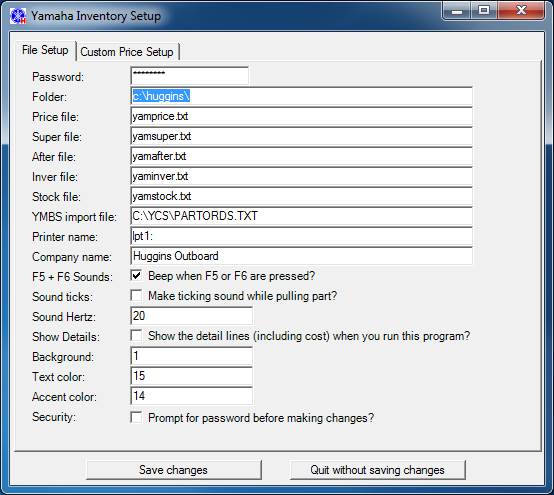
Setup Screen
To setup or modify the program setting, select “Setup” from the File menu, or select the F9=SET button, or press F9 on the keyboard. These setting control the program and should only be modified by authorized personnel. For security purposes, the settings are password protected.
Note: Changes made to the setup can result in losing inventory data. DO NOT make any changes to these settings without first backing up the database.
Program Password Maintenance:
To make changes to the program settings, first enter the proper Password. To change the Password, perform the following:
1. Backup the Program.
2. From the Setup screen, enter the current program Password. If correct, the fields should change from gray to white and authorize changes.
3. Select
the Password field agan and type the new Password.
Note: Asterisks will display for security purposes.
4. Select the “Save changes” button at the bottom of the screen.
5. Make a note of the new Password and store it in a secure location for future reference.
If you lose or forget the program password, Huggins technical support may be able to help.
File Setup Tab
Password:
Enter the program Password.
Folder:
The Huggins program files are loaded in the folder defined by this computer path. A backslash is required at the end of the path. The default is C:\huggins\. (Do not modify the folder unless instructed to do so by Huggins technical support.)
Price File:
This is the program name for the Price file. (Do not modify unless instructed to do so by Huggins technical support.)
Super File:
This is the program name for the Supercede file (Do not modify unless instructed to do so by Huggins technical support.)
After File:
This is the program name for the Aftermarket file. (Do not modify unless instructed to do so by Huggins technical support.)
Inver File:
This is the program name for the Inver file. (Do not modify unless instructed to do so by Huggins technical support.)
Stock File:
This is the progam name for the Stock file. (Do not modify unless instructed to do so by Huggins technical support.)
YMBS Import File:
This is the program name for the Yamaha Marine Business System files. The default is C:\YCS\PARTORD.TXT. (Do not modify unless instructed to do so by Huggins technical support.)
Printer Name:
This is the port setting for the local printer. The default is LPT1.
Company Name:
This is the business name to display at the top of the program.
F5 + F6 Sounds:
Check this box to turn a beeping sound on when F5 removes inventory parts or F6 adds inventory parts to the program.
Sound Ticks:
Check this box to turn on a ticking sound when pulling parts.
Sound Hertz:
This sets the frequency for the computer speakers. The default is 20 Hz.
Show Details:
Checking this box sets the program default to “show part details” when started. This option can be toggled on and off at any time by selecting the F8 key.
Background:
This number is the background color for the MS-DOS version of the program.
Text Color:
This number is the text color for the MS-DOS vesion of the program.
Accent Color:
This number is the accent color for the MS-DOS version of the program.
Security:
Checking this box will require entering the password before adding or deleteing inventory from the program.
Custom Price Setup Tab
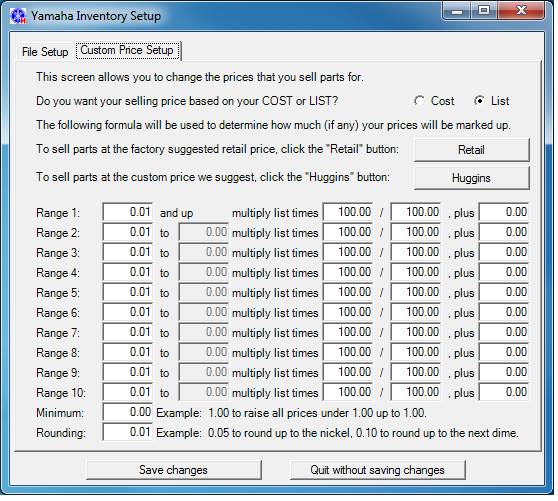
Custom Price Setup Screen
Before making changes to the Custom Price Setup tab, enter the Password on the File Setup tab. The fields should change from gray to white.
Do you want your selling price based on Cost or List?
Select which method to use for custom pricing. The default setting is List.
To sell parts at the factory suggested retail price:
To use the Published List Price, which is the program default, select the “Retail” button. Select the “Save changes” button and the program will close the screen.
To sell parts at the Huggins price:
The Huggins price strategy uses a combination of minimum price and markup percentage based on the range of the list price.
· For parts listed under $1, the price is list plus $1.
· For parts listed between $10 - 100, the price is list plus 10%.
· For parts listed above $100, the price is list plus $10.
The following example shows the Huggins formula.
EXAMPLE
100.01 – UP : 0.0% + $10.00
10.01 - 100.00 : 10.0%
0.01 - 10.00 : 0.0% + $ 1.00
To sell parts at the Huggins suggested price, select the “Huggins” button. Select the “Save changes” button and the program will close the screen.
Custom Pricing Strategies
The Custom Price Setup tab allows you to enter your price ranges, percentages, and fixed increases the way that makes sense for your business. The Range fields allow creating pricing ranges by entering the beginning dollar amount and then the ending dollar amount. You can create up to 10 custom pricing ranges.
The price range formulas allow changing the numerator or the denominator of the multiplying percentage depending on the value of the part. For example, to add a 10% markup, the range formula is 110/100; or to build in a 10% discount, the range formula is 90/100.
The Plus field adds a fixed increase to offset lower priced parts to help with overhead costs. For higher priced parts, the Plus field can cover shipping and postage for special orders or shipping costs.
Note: If you are also using the Huggins Accessory Program, duplicate the custom formulas in both this and the Huggins Accessory Program. For details refer to the Huggins Accessory Program User’s Guide or contact Huggins technical support.
There are several possible ways to increase your profit:
1. Establish a dealership minimum price (Example: Dealership minimum of 0.95).
2. Use
a custom price formula based on List price:
A. Across the board markup (Example: All prices 10% above List)
B. Interval based strategies
EXAMPLE
100.01 - UP : 5.0%
20.01 - 100.00 : 10.0%
10.01 - 20.00 : 15.0%
5.01 - 10.00 : 20.0%
.01 - 5.00 : 25.0%
3. Use
a custom price formula based on Cost:
A. Across the board markup (Example: All prices 100% above Cost)
B. Percentage based on Cost ranges
EXAMPLE
100.01 - UP : 66.0%
10.01 - 100.00 : 75.0%
.01 - 10.00 : 100.0%
Minimum: This field sets a Minimum selling price for all Yamaha Marine parts. For example, if $1.00 is set as the minimum selling price, a part with a suggested list of $0.85 will automatically be marked up to $1.00.
Note: You can use this feature without doing custom pricing. Just set the minimum selling price to have all parts with a suggested list price below the minimum marked up.
Rounding: This field rounds up the price by the multiplier entered. For example, set the rounding to 0.05. For a part with a list price of $32.57, the price displayed will be $32.60.
Note: You can use this feature without doing custom pricing. Just set the rounding multiplier to have all part prices based on this number.
Print Preview
To preview the part information in the results screen for printing, select “Print Preview” from the File menu. A screen pops up with the information to be printed. Select the printer icon to send this screen to the default printer.
Print Preview Screen
To send the part information in the results screen to the printer, select “Print” from the File menu. The data is sent to the printer port define in the Setup screen.
Exit
To exit the Huggins program, select “Exit” from the File menu. All open windows associated with the program will close.
View Menu
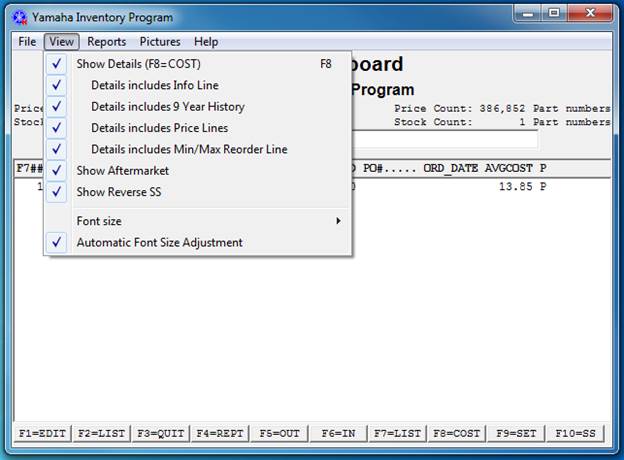
The View menu deals with the overall program look and information displayed. A keyboard shortcut is also available to expedite showing details.
Show Details [F8]
Check the Show Details [F8=COST] option to set the program startup default to show up to 4 extra lines of information for each part. Selecting the [F8=COST] button or pressing the F8 key on the keyboard toggles this feature on and off during operation.
Note: To customize which lines of information are displayed, individually check the 4 options listed below Show Details.
Details Includes Info Line
Check the “Details Includes Info Line” to turn on/off the first line of data containing part info entered when Show Details is on. The program default is set to on.
Details Includes 9 Years History
Check the “Details Includes 9 Years History” to turn on/off the second line of data containing previous YTD part sales history when Show Details is on. The program default is set to on.
Details Include Price Line
Check the “Details Includes Price Line” to turn on/off the third line of data containing price and cost data when Show Details is on. The program default is set to on.
Details Includes Min/Max Reorder Line
Check the “Details Includes Min/Max Reorder Line” to turn on/off the fourth line of data containing stock parameters and reorder information when Show Details is on. The program default is set to on.
Show Aftermarket
Check the “Show Aftermarket” option to turn on/off the compatible aftermarket products. The program default is set to on.
Show Reverse SS
Check the “Show Reverse SS” option to turn on/off the part numbers that preceeded (reverse superseded) the searched part number.
Font Size
Select the font size of the part data to enlarge or reduce the text display.
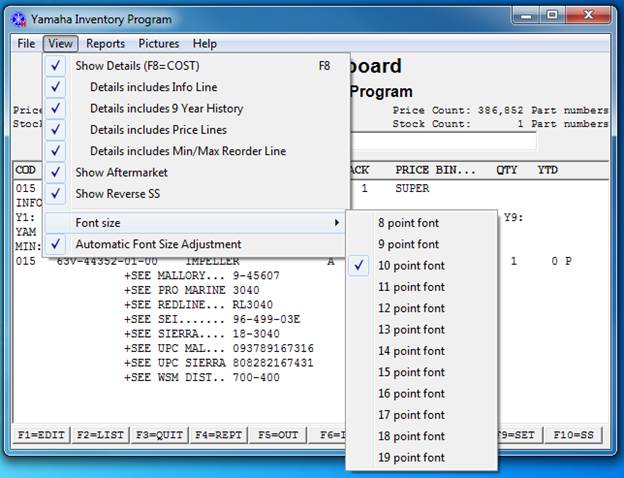
View Font Size Menu
Automatic Font Size Adjustment
Check the “Automatic Font Size Adjustment” option to allow the program to enlarge or reduce the part data displayed to fit the window size. To adjust the size of the program window, position the cursor at the edge of the program window or in any of the four corners. When the cursor changes to an arrow, click and drag the window to the desired size. The font size will adjust automatically to fit the new window size.
Reports Menu
Reports Menu with Purchase Orders Menu
The Reports menu generates information related to the parts data to assist with purchashing parts, viewing stock quantities, pricing, and maintaining the database. Keyboard shortcuts are also available to expedite funtions and usage.
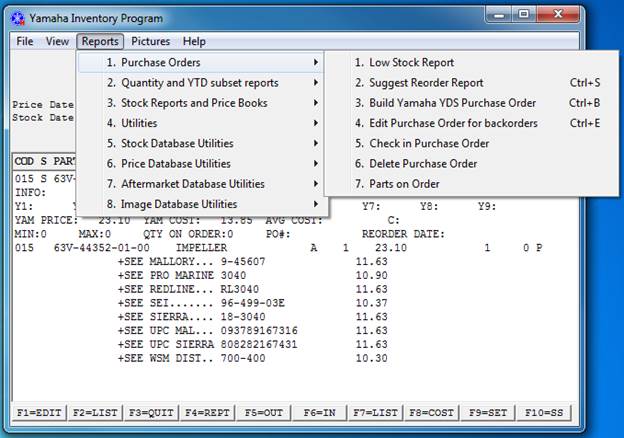
Purchase Orders
The Purchase Orders menu generates information related to low or out-of-stock parts, and creates and manages the purchase order process. Keyboard shortcuts are also available to expedite funtions and usage.
1. Low Stock Report
This option produces a listing of all parts in the database where the quantity on hand is less than the minimum quantity desired. This report also includes all parts that are on order but have not arrived and been checked into the program.
2. Suggested Reorder Report (CTRL + S)
This option produces a listing of all parts to order and excludes any parts currently on order. This report is helpful to evaluate the MIN and MAX values assigned. Adjust MIN and MAX values if needed and then rerun the report.When the list displays the parts to order, generate a purchase order using option “3. Build Yamaha Marine Business System Purchase Order” described in the next section. A keyboard shortcut is available to generate the purchase order by pressing (CTRL + S).
Note: For fast selling parts that may currently be on order, if the current quantity in stock plus the quantity on order is less than the MIN value, then the new purchase order will include the amount needed to bring the total quantity up to the MAX level.
3. Build Yamaha Marine Business System Purchase Order (CTRL + B)

Create Yamaha Purchase Order Screen
This option displays a series of choices about how to configure the purchase order described in the following paragraphs.
Note: Pressing CTRL plus B together on the keyboard launches this option.
Purchase Order Number:
The Purchase Order Number field is automatically assigned a PO number based on the current date. To change the PO number, type up to 8 characters in the field.
Purchase Order Type
Select the Yamaha Marine Business System option to transmit this purchase order with the “Yamaha Marine Business System” or select “Huggins system Only” to phone in or FAX the purchase order.
Yamaha Marine Business System
Selecting “Yamaha Marine Business System” changes additional fields from gray to white. Use the drop down choices to configure the PO.
Back Order OK:
Click on the drop down arrow to make a selection related to Back Orders. Choose YES if putting the part on back order is OK if not currently available from the Yamaha warehouse or NO if it is not OK. The default setting is YES.
Alternate Warehouse:
Click on the drop down arrow to make a selection related to Alternate Warehouse. Choose YES to allow shipments from another warehouse or NO if it is not OK. The default setting is YES.
Freight Code:
Click on the drop down arrow to make a selection related to Freight Code. Choose from options numbered 0 through 14. Scroll down to see all the choices. The choices include:
0=DEFAULT
1=WILL CALL PICK UP
2=AIR PARCEL POST
3=UPS 2nd DAY
4=FEDEX NEXT DAY
5=AIR FREIGHT
6=UPS GROUND
7=EXPRESS MAIL
8=TRUCK FREIGHT
9=UPS NEXT DAY
10=FEDEX GROUND
11=UPS NEXT DAY SAT
12=FED-X NEXT DAY SAT
13=UPS 3 DAY SELECT
14=FEDEX 2ND DAY
OK and Cancel Buttons
Select the OK button to create the purchase order or Cancel to quit. This action exits the pop up window and if OK is selected, the purchase order generated will display in the Part Number Search screen. See an example of a PO generated in the following graphic.
Reports Screen with Sample Purchase Order
This screen displays a listing of the purchase order that was created. Users can print this information by selecting File \ Export Current Display to Notepad and then selecting the Print option from their notepad application. Please keep in mind that the purchase order now needs to be transmitted to Yamaha Marine via the Yamaha Marine Business System Order website.
Huggins system Only
Selecting “Huggins system Only” to create the purchase order grays out the configuration fields. After selecting OK, print and FAX the purchase order to Yamaha Marine or call in the order.
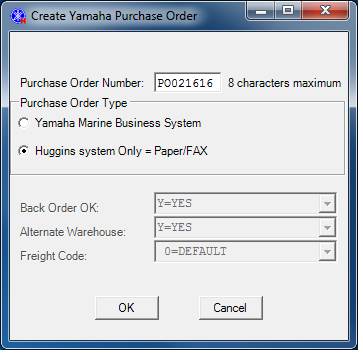
Create Yamaha Purchase Order with Huggins system Only
4. Edit Purchase Order for Backorders (CTRL + E)
Use this option to edit a purchase order for back orders before checking it into the program. From the “Reports” menu, select “Purchase Orders” and then, “4. Edit Purchase Order for backorders,” or use a keyboard shortcut by pressing the CTRL and E keys together. A screen similar to the following graphic will display.

Sample Edit Purchase Order Screen
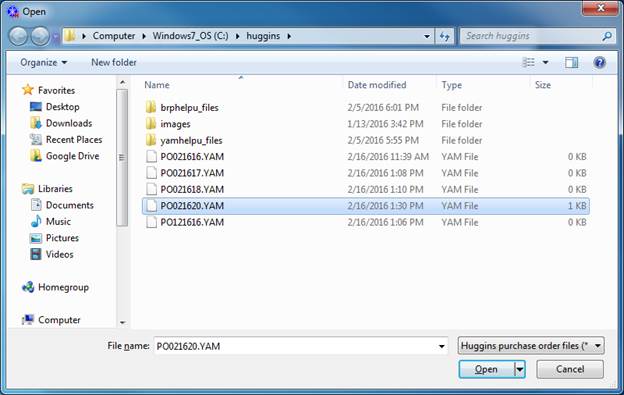
From the screen, select the purchase order to edit by either double-clicking the purchase order number, or by highlighting the purchase order number and selecting the Open button.
A prompt with editing instructions appears similar to the following graphic.
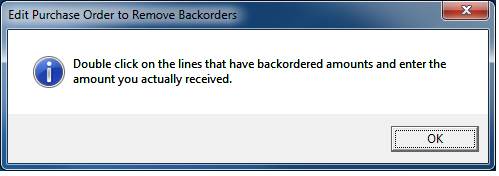
Edit Purchase Order Prompt
Select OK and the contents of the purchase order will displayed in a screen similar to the following graphic.
Sample Purchase Order Details Screen
Double-click the part number that needs editing. A dialog box with Purchase Order data appears similar to the following graphic. All fields are gray and cannot be edited except the quantiy shipped.
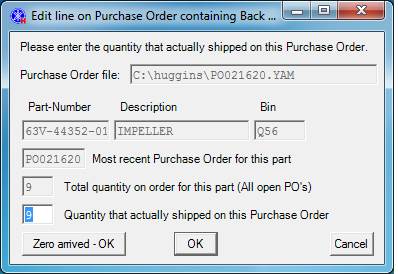
Edit Line in Purchase Order Dialog
If the quantity actually shipped is less than the quantity ordered, change the PO to reflect the quantity shipped. If none were received, select the “Zero arrived – OK” button. Repeat this process for all parts listed on the PO that have partical shipments and need editing. After editing all parts, check in the PO.
Note: Editing part numbers does not remove them from the Purchase Order. The items are still “On Order” in the program. This process only edits the purchase order in preparation for checking the parts into inventory.
5. Check in Purchase Order
Use this option to check in a purchase order and the arrived parts into the program. From the “Reports” menu, select “Purchase Orders” and then, “5. Check in Purchase Order.” A screen similar to the following graphic will display.
Sample Check In Purchase Order Screen
From the screen, select the purchase order to check in by either double-clicking the purchase order number, or by highlighting the purchase order number and selecting the Open button.
After selecting the purchase order, the program will return to the Part Number Search screen and display a screen similar to the following graphic:
Sample Check in Purchase Order Results Screen
The checked in parts are added to the current inventory quantity in stock. They are also subtracted from the QTY ON ORDER.
If all parts on the PO arrived and were checked in, the PO is removed from the program. If some parts are still on backorder, one of two things occurs:
1.
The backordered parts still have
QTY ON ORDER and the PO remains active.
Note: If backorders are not kept, then manually remove the
QTY ON ORDER and the PO# information for backordered parts.
2. The QTY number plus the QTY ON ORDER number is below the MIN value and additional parts are ordered on another PO. The amount still on order is reflected in the QTY ON ORDER field and the latest PO number is listed on in the PO# field.
6. Delete Purchase Order
Use this option to delete a purchase order from the program. From the “Reports” menu, select “Purchase Orders” and then, “6. Delete Purchase Order.” A screen similar to the following graphic will display.

Sample Delete Purchase Order Screen
From the screen, select the purchase order to delete by either double-clicking the purchase order number, or by highlighting the purchase order number and selecting the Open button.
A prompt with a warning appears similar to the following graphic.
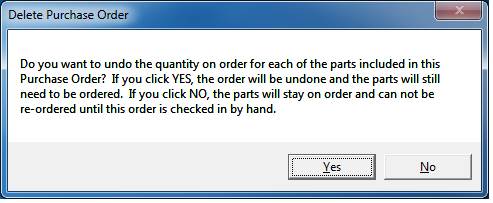
Delete Purchase Order Warning
Selecting YES removes the PO Number and Order Date and adjusts the QTY ON ORDER for each part in the purchase order.
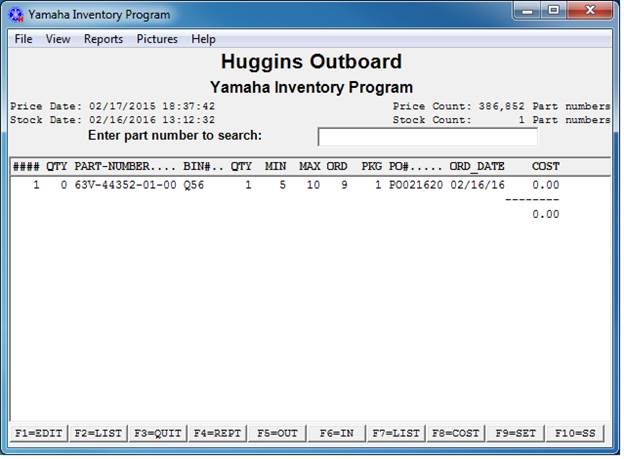
7. Parts on Order
Use this option to create a list of all parts on order from the program. From the “Reports” menu, select “Purchase Orders” and then, “7. Parts on Order.” The list includes backordered parts as well as parts on current purchase orders. Parts currently on order have a PO# and REORDER DATE.
Qty-YTD Subset Reports
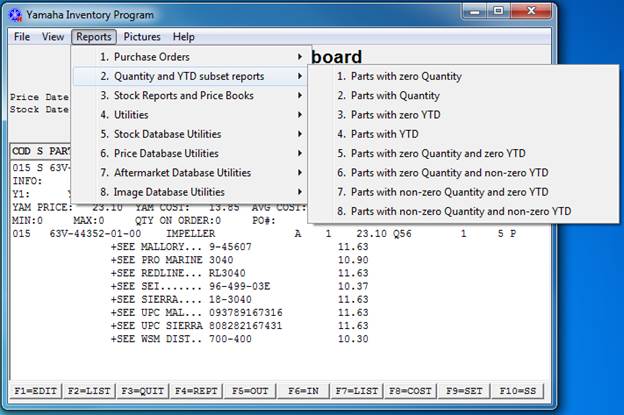
Reports Menu with Quantity and YTD Menu
The Qty-YTD Subset Reports menu generates information related to part quantities on hand and year to date quantity sold.
1. Parts with Zero Quantity
This option generates a listing of all parts out of stock with QTY=0.
2. Parts with Quantity
This option generates a listing of all parts in stock.
3. Parts with Zero YTD
This option generates a listing of all parts that have no sales for the year (YTD=0).
4. Parts with YTD
This option generates a listing of all parts that have sales for the year.
5. Parts with zero Quantity and zero YTD
This option generates a listing of all parts out of stock (QTY=0) and have no sales for the year (YTD=0). These are typically special order items kept in the database for historical purposes.
6. Parts with zero Quantity and non-zero YTD
This option generates a listing of all parts that have sales for the year but are currently out of stock (QTY=0).
Note: If these parts are in inventory at the first of the year, they might be oversights to reorder. If these are special order parts, leave them in inventory to make the statistics more accurate.
7. Parts with non-zero Quantity and zero YTD
This option generates a listing of all parts in stock that have no sales for the year (YTD=0). These are possible candidates to return, salvage, write-off, etc.
8. Parts with non-zero Quantity and non-zero YTD
This option generates a listing of all parts in stock that have sales for the year.
Stock Reports and Price Books
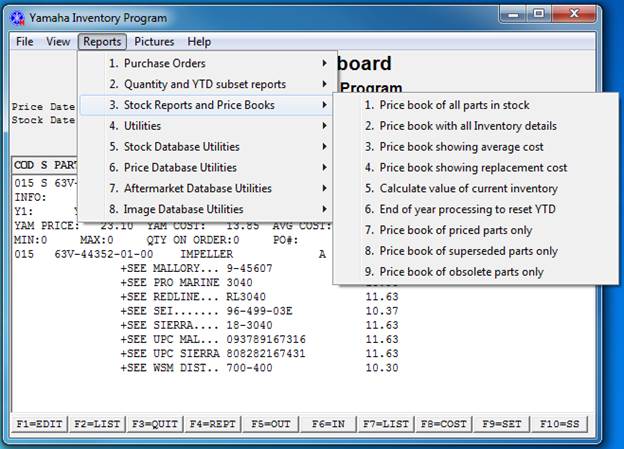
Reports Menu with Stock Reports and Price Books Menu
The Stock Reports and Price Books menu generates information related to financial data of stock and inventory.
1. Price book of all Parts in Stock:
This option generates a listing of all parts in stock along with list price, quantity, bin, and YTD information.
Note: A printed verson of this report is very useful in case the computer goes down. Keep the records up-to-date on the printed report by marking parts sold and then update the database from the printed report when the computer is back up.
2. Price book with all Inventory Details:
This option generates a detailed listing of everything entered in the database for all parts stocked along with list price, quantity, bin, and YTD information.
3. Price book showing Average Cost:
This option generates a listing of all parts in stock along with average cost, quantity, bin, and YTD information.
Note: This report is a good source for the actual cost of all inventory.
4. Price book showing Replacement Cost:
This option generates a listing of all parts in stock along with current cost, quantity, bin, and YTD information.
Note: This report is a good source for the replacement cost of your inventory.
5. Calculate Value of Current Inventory:
This option generates a listing of how many parts are sold year to date and how many different part numbers are involved. This is useful data for inventory management decision-making.
Note: Use this report at the end of the year to identify the best selling parts and those that do not sell. This is useful information to adjust the maximum quantity on hand up or down. Consider eliminating parts that tie up money and inventory space but do not sell. Keep them in the database but sell them as special order.
This report includes year-to-date inventory totals for “average cost,” “current cost,” “suggested list price,” and “dealership list price.” The totals for “suggested list price” and “dealership list price” should match unless a custom pricing formula is used. Also included are sales totals for the current year and the previous nine years.
A special field is included that lists the number of errors associated with each calculation. These errors are due to inventory parts missing some of the following numbers:
· Average Cost
· Yamaha (current) Cost
· Yamaha (suggested) List Price
· Dealership List Price
These errors indicate how many parts had $0.00 for average cost, Yamaha cost, suggested list price, or dealership list price. Part numbers that have errors appear at the top of the report with an explanation of the error. Address and correct all errors and rerun the report to arrive at accurate totals. Some are tools in the Utilities menu can help with this process.
The report also includes a count of parts in inventory that are not in the Yamaha Pricebook. These may represent entry mistakes or parts obsoleted by Yamaha. Huggins provides a list of the parts deleted from the Pricebook with Price Updates. For parts not in the Pricebook, update the cost, average cost, and List price fields using the Edit screen.
6. End of Year Processing to reset YTD: (Close Year)
This option moves all year-to-date sales information to history and zeros the current year. Perform this operation only at the end of your accounting year.
Note: Perform this procedure only once a year in order to produce accurate YTD inventory totals. Make it a part of the fiscal year accounting close out process.
The program maintains 9 years of sales history for each part number in inventory. Selecting this option moves the current year totals into the first year of history. All previous years of history move back one year and the oldest year is deleted.
As a safeguard, the following warning is displayed when this option is selected:
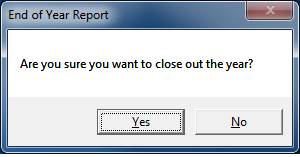
End of Year Closing Warning
Select the Yes button to continue or No to cancel this action. Selecting Yes brings up the following question:
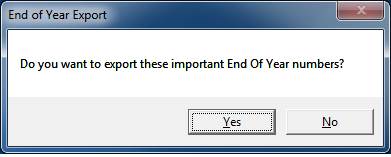
End of Year Export Dialog
Selecting Yes generates a report to print as a backup set of records. Selecting No continues the end-of-year report without exporting a print file.
Note: When this operation is in progress, it is very important not to interrupt the computer. An interruption leaves the process incomplete and corrupts the history data because some history is moved while other data is not. You can rerun the report but the parts processed twice will have their history counts moved down two years as a result. A utility program is available to rollback the data if necessary. See the Rotate YTD, Y-1, Y-2, etc. Backwards utility for details.
7. Price book of Priced Parts Only
This option generates a detailed listing of all inventoried parts that have a non-zero list price, sorted by part number.
8. Price book of Superseded Parts Only
This option generates a listing of all inventoried parts that have superseded data.
9. Price book of Obsolete Parts Only
This option generates a listing of all inventoried parts that are obsolete. A blank report indicates no inventoried parts are oblolete.
Utilities

Reports Menu with Utilities Menu
The Utilities menu provides tools to quickly adjust data fields to modify the database.
1. Set all Min’s and Max’s to Current QTY
This option allows setting the MIN and MAX values to equal the current quantity on hand. This option stops the ording of new parts until one sells, thus controlling inventory costs. Modify the MIN and MAX values using the Edit screen for parts that need higher or lower inventory levels from the current amount on hand.
2. Set all Avg Cost to Current Cost
This option adjusts all average costs to the current cost, ignoring the orginal price paid for the parts in inventory. This utility is useful to get a current inventory value for insurance purposes or to help price your dealership when selling.
3. Set all Avg Cost that are 0 to Current Cost
This option finds average cost fields listed as zero and changes the value to the current cost. This is a quick way to clean up error messages in the Year End Report.
4. Set all Avg Cost that are 0 to 0.01
This option finds average cost fields listed as zero and changes the value to one cent. This is a quick way to clean up the error messages in the Year End Report with minimal changes to the average cost field.
5. Rotate YTD, Y-1, Y-2, etc. Backwards
This option rotates all inventoried sales history numbers back one year. Use this option if you accidentally run a Year-End Report twice. The YTD fields are rotated backwards every time this utility is run.
6. Set all QTY Fields Back to 0
This option changes the quantity of all inventory stocked to zero. This option is helpful when doing a physical inventory to get a clean slate in the database.
Note: Before selecting this option, make a backup of the existing database as a reference point or to reinstall the program data.
7. Reserved
This option is not used at this time.
8. Rebuild Reverse Supersede Database
This option builds the reverse supersede database.
Stock Database Utilities
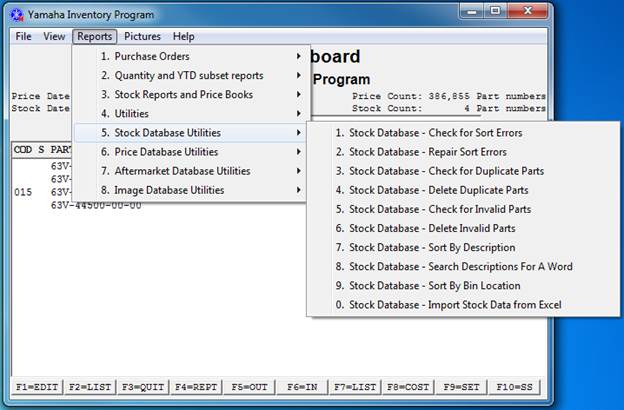
Reports Menu withStock Database Utilities Menu
The Stock Database Utilities menu generates information related to troubleshooting the stock database for errors, duplicate parts, invalid parts, and search by word or descriptions, or sort by bin locations. Also included is an import utility to include stock from an Excel file.
1. Check for Sort Errors:
This option searches the database and generates a report of stocked parts that contain sorting errors.
2. Repair Sort Errors:
This option takes parts with sorting errors and repairs them.
3. Check for Duplicate Parts:
This option reviews the database and generates a report of duplicated part numbers.
4. Delete Duplicate Parts:
This option takes parts found in the database with duplicate part numbers and deletes the duplicates.
5. Check for Invalid Parts:
This option checkes the stocked parts for compatibality with the Yahama parts list and generates a report of parts that are invalaid.
6. Delete Invalid Parts:
This option takes the parts found in the database that are invalid and deletes them.
7. Sort by Description
This option sorts all stocked parts by their description and lists them in alphabetic order. Parts that have a blank description are listed first.
8. Search Descriptions For a Word
This option searches the descriptions of all parts stocked and generates a list of the parts that have the search word in the description. Selecting this option displays the following prompt with a field to enter the word to search.

9. Sort by Bin Location:
This option produces a listing of all of the stocked parts, sorted by the bin location for each part. The report also includes the list price and YTD sales information.
Note: This report is very useful when taking a physical inventory. Printing this report without the current database quantities listed is one way to encourage counting each part in each bin during a physical inventory.
This option displays the following dialog box to customize the output options for the report.

Sort By Bins Report Screen
0. Import Stock Data from Excel
This option replaces current database information with data in an Excel spreadsheet. Back up the database before using this option in case you need to reverse this process. The following screen will display to define the import parameters.
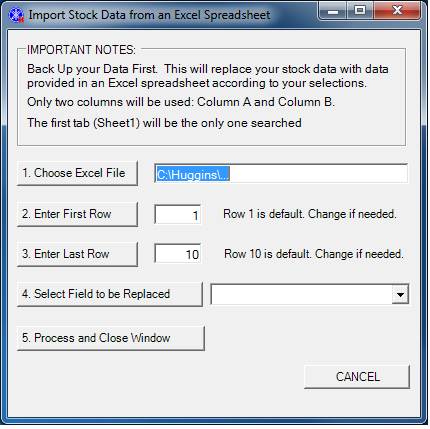
Import Stock Data from Excel Screen
Price Database Utilities
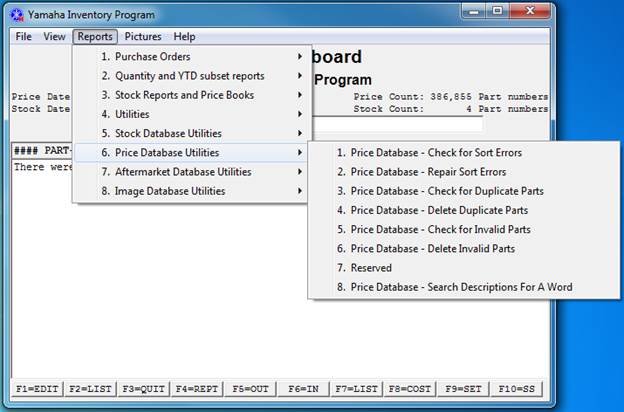
Reports Menu with Price Database Utilities Menu
The Price Database Utilities menu generates information related to troubleshooting the pricing information for sort errors, duplicate parts, invalid parts, and search by word or descriptions.
1. Check for Sort Errors
This option searches the database and generates a report of stocked parts that contain sorting errors.
2. Repair Sort Errors
This option takes parts with sorting errors and repairs them.
3. Check for Duplicate Parts
This option searches the database for duplicated part numbers
4. Delete Duplicate Parts
This option takes duplicate part numbers and deletes them.
5. Check for Invalid Parts
This option checkes the stocked parts for compatibality with the Yahama parts list and generates a report of parts that are invalaid.
6. Delete Invalid Parts
This option takes invalid part numbers and deletes them.
7. Reserved
This option is reserved for future use.
8. Search Description for a Word
This option searches the descriptions of all parts stocked and generates a list of the parts that have the search word in the description. Selecting this option displays the following prompt with a field to enter the word to search.
Aftermarket Database Utilties
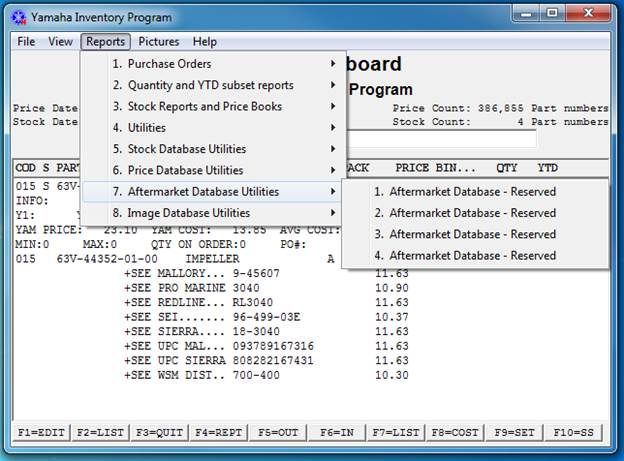
Reports Menu with Aftermarket Database Utilities Menu
The Aftermarket Database Utilities menu has four options that are reserved for future use.
1. Aftermarket Database – Reserved
Reserved for future use.
2. Aftermarket Database – Reserved
Reserved for future use.
3. Aftermarket Database – Reserved
Reserved for future use.
4. Aftermarket Database – Reserved
Reserved for future use.
Image Database Utilties
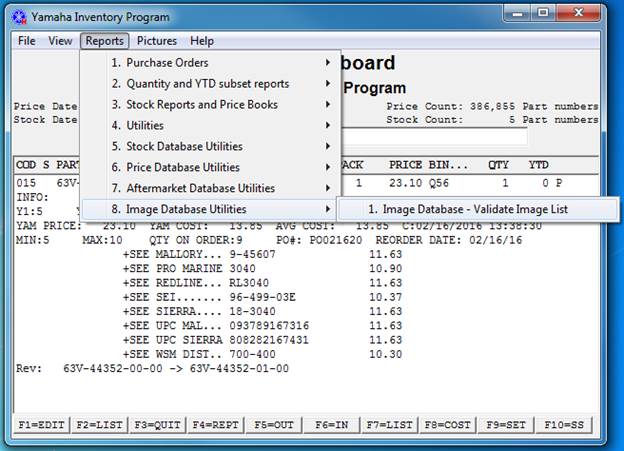
Reports Menu with Image Database Utilities Menu
The Image Database Utilities menu has one option that validates the image database containing pictures of each part.
Pictures Menu
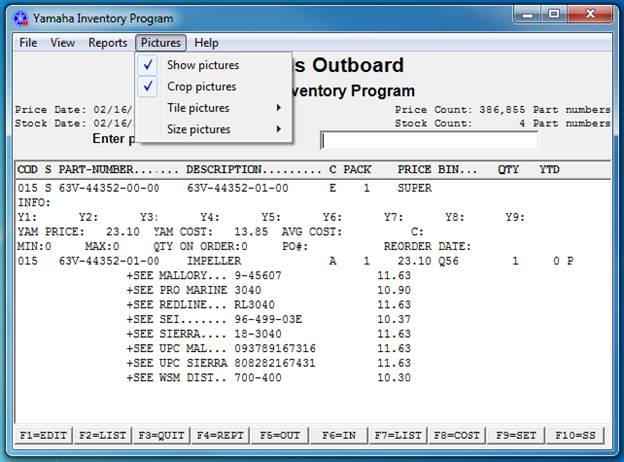
Pictures Menu
The Pictures menu allows pictures of each part in the image database to display on the screen and the parameters related to how they are displayed.
Show Pictures
Checking this option turns on or off the pictures for the part number entered. The program default is on.
Crop Pictures
Checking this option turns on the crop utility, reducing the white edges of each picture, and taking less space on the screen. The program default is on.
Tile Pictures
This option sets the display properties when multiple pictures exist for one part. The choices include displaying from 1 to 10 images across the screen. To optimize this selection, change it after the pictures display to organize the viewing of all windows on the screen. For example, if 4 pictures exist and the selection is set to “Tile pictures 2 across,” the program displays 2 pictures across the first row and 2 pictures across the second row. The following screen shows the Tile Pictures menu.
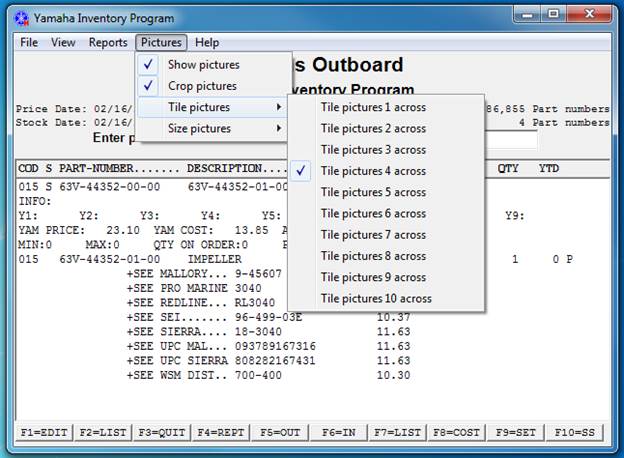
Pictures Menu with Tile Pictures Menu
Note: You can manually move pictures on the screen. Select the name of the picture and drag it to the desired location.
Size Pictures
This option sets the picture display size. The choices include displaying 10 different resolution sizes. To optimize the detail size needed for a picture, change the size after the pictures displays. The following screen shows the Size Pictures menu.
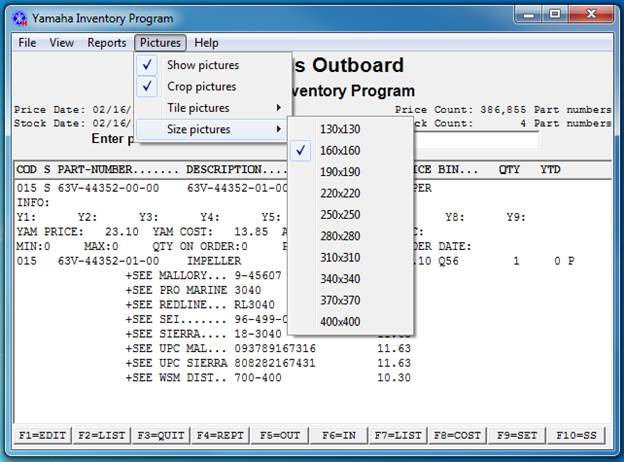
Pictures Menu with Size Pictures Menu
Note: You can manually change picture sizes on the screen. Select the edge of the picture and drag it to the desired size.
Help Menu
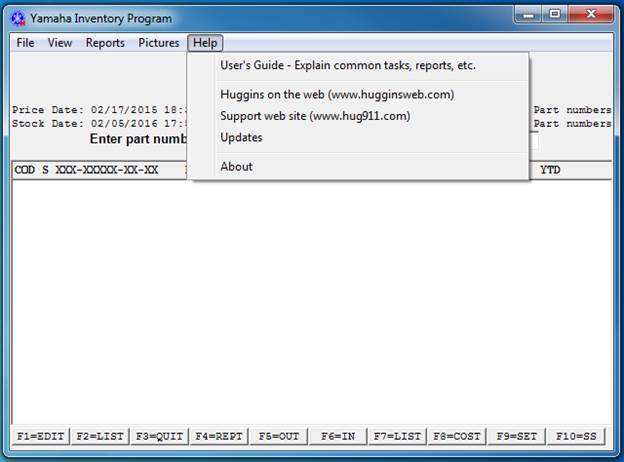
Help Menu
The Help menu provides support resources including the User’s and Reference Guide, support websites, and program updates.
User’s Guide
Selecting this option opens this User’s Guide and Reference Guide to assist with use and operation of the Huggins program.
Huggins on the Web (www.hugginsweb.com)
Selectin this option initiates a connection to the Internet and connects with the Huggins main website. This site contains information on additional Huggins software programs, as well as information on price updates.
Support Web Site (www.hug911.com/)
Selectin this option initiates a connection to the Internet and connects with the Huggins Customer Service website. This site contains information on program upgrades, updates, as well as current part counts for the Yamaha price database.
Updates
Selecting this option initiates a connection to the Internet and connects with the Huggins Customer Service website to determine if an update is available for the installed program. Instructions provide the procedures for how to update to the latest version of the Huggins program.
About
Selecting the “About” option displays a screen similar to the following.

Huggins Yamaha Inventory Program About Screen
The About screen contains the following information:
· Copyright date, program version, serial number, date customized by Huggins technical support, and dealership name
· Yamaha Price file – timestamp and total number of parts in the current price database
· Yamaha Stock file – timestamp and total number of parts in the current inventory database
· Yamaha Super file – timestamp and parts count of superceded parts
· Yamaha After file – timestamp and parts count of aftermarket cross reference parts
· Yamaha Inver file – timestamp and parts count of the Huggins inver file
· Yamaha Image file – timestamp and count of images in the image database