Introduction
This guide describes the functions available to users of the Huggins Evinrude/Johnson Inventory Control Program. This guide will assist you with the operation of your Huggins Evinrude/Johnson Inventory Control Program. Users who have experience with previous versions of Huggins Inventory Control software will discover that we have worked very hard to make your transition to this version a simple one. Many of the keystrokes required to perform activities have been retained, and new features have been added to help you manage your inventory. New users should find the program easy to use with simple drop down menus and keyboard “shortcuts” which simplify navigation. Whether you are a new user, or a seasoned user of the Huggins System, please take a few moments and read through this guide to familiarize yourself with the program’s capabilities.
This guide has been divided into two sections: a Users Guide and a Reference Guide. The Users Guide covers common questions often asked about system operation and presents “How To” questions that users often ask. The Reference Guide provides detailed information about the programs functionality, covering each program option in detail. Users can navigate through the guide by pressing PAGE UP and PAGE DOWN on their keyboards or via the highlighted hyperlinks that appear throughout the document.
While using the guide please remember, there is no such thing as a dumb question! If after researching an issue you still have questions, or if you have suggestions that you believe would enhance the program, simply contact us and let us know! Our dealer network has helped make the Huggins Inventory Control Program the best product of its type available today. With your continued support and cooperation, we are confident that our software will help you manage your inventory and make your business more profitable.
Click
here to access the Users Guide.
Click here to access the Reference Guide.
Users Guide
Table of Contents
How do I install the Huggins Inventory Control Program?
How do I search for a part number?
How do I access the Program setup options?
How do I change my Program Password?
How do I change the default filenames the system uses?
How do I change the company name displayed on the main screen?
How do I setup a custom pricing formula?
What are some common pricing strategies to consider using?
How do I load my existing inventory into the program?
How do I take a part out of inventory?
How do I return a part to my inventory?
How do I delete a part from my inventory?
How do I lookup a part number I don’t stock?
How do I create a new pick list?
How do I add parts to my existing pick list?
How do I generate a Low Stock Report?
How do I generate a Suggested Reorder Report?
How do I create a Purchase Order?
How do I send a send a purchase order created by the Huggins Inventory Program to BRP?
How do I edit a Purchase Order before checking it in?
How do I check in a Purchase Order?
How do I delete a Purchase Order?
How do I generate a Parts On Order Report
How do I see all of the parts managed by StockPro?
How do I generate a report of all part numbers that I stock but am currently out of?
How do I generate a report of all part numbers that I stock and currently have in inventory?
How do I generate a report of all part numbers that I stock but have not sold this year?
How do I generate a price book of all of my parts?
How do I generate a detailed listing of all of my parts?
How do I generate a listing of the dollar value of my current inventory?
How do I generate a listing of the replacement value of my current inventory?
How do I calculate the value of my current inventory?
What is Year End processing and how do I do it?
How do I generate a report to take my physical inventory with?
How do I set the Average Cost on all parts I inventory to the current cost?
How do I change the Average Cost on parts I inventory that are currently $0.00 to the current cost?
How do I change the Average Cost on parts I inventory that are currently $0.00 to $0.01?
How do I rotate all of my YTD sales history backwards one year?
How do I reset all of my part numbers back to 0 on hand?
How do I contact Huggins Outboard for technical support?
How do I link the PartSmart software to my Huggins Inventory Program?
How do I backup my Inventory for safety purposes?
How do I search for a part number?
In order to search for a part number, users simply type the part number in the Enter Part Number to Search field and press enter. The Huggins Program then searches for the part number requested. You can enter part numbers with or without the leading zeros. If you leave the leading zeros off a part number that you enter, you will see that they have been added for you by the program.
How do I access the Program setup options?
Users can access the Program setup options by clicking the F9 button on the screen, by pressing the F9 key on the keyboard, or via the File\Setup menu option. For security purposes, users will need to enter the system PASSWORD before any changes can be made to the system configuration.
How do I change my Program Password?
For security purposes, users must know the existing system PASSWORD in order to change the system PASSWORD. Additional information on system security can be found here.
How do I change the default filenames the system uses?
Changes are made to the default system filenames by accessing the system Setup menu. Users are discouraged from changing the default filenames unless directed to do so by Huggins technical support personnel.
How do I change printers?
Users can change the printer used for a report in the Print dialog. Click the File menu and choose Print. This Huggins Inventory Control Program creates all reports in the Search Results Field on your computer’s screen. Reports can then be printed by clicking File\Print Preview, File\Print, or by clicking File\Export Current Display to Notepad. When you print from File\Print Preview, you cannot select a range of pages and you cannot select a printer other than your default windows printer. When you print from File\Print, you CAN select a range of pages and you CAN select a printer other than your default windows printer. When you export to Notepad, the contents in the search results field will then be displayed within the notepad application included with your operating system. Once the information is displayed in your systems notepad application, you can save the information with a file name of your choice, or print the information with your default Windows printer.
How do I change the company name displayed on the main screen?
Users can change the company name displayed on the main screen by accessing the Setup menu. There is a “Company name:” slot on the setup screen for you to type the name that you want displayed on your screen.
How do I setup a custom pricing formula?
In today’s challenging business environment, many dealers elect to implement custom pricing to make them more profitable. Users can implement custom pricing by accessing the system Setup screen and then clicking on the Custom Price Setup tab.
What are some common pricing strategies to consider using?
Information on Custom Pricing Strategies can be found here.
How do I load my existing inventory into the program?
Loading your existing inventory into the Huggins Inventory Control Program in an accurate manner will ensure that the system manages your inventory properly. Many users choose to take a physical inventory of their existing parts before starting this task, and some users choose to use an existing inventory record such as a card file or inventory report from another computer program. Users should evaluate the accuracy of any existing information before relying on it as the source for setting up your inventory in the Huggins System. Users that are converting from another computer program should be aware that Huggins Outboard Computer Programs can convert your existing inventory data for use in the Huggins System for a small fee. Please feel free to contact us for additional information on data conversion if you are using an existing computer program and are confident that the information is current and accurate.
To begin loading your inventory, users will need to turn on the Show Details option by selecting it in the View menu, by clicking on the the F8 button, or by simply pressing the F8 key on your keyboard.
Type the part number you wish to enter into the Enter Part Number to Search field and press Enter. You will see several columns of information including: the part number you typed followed by a description and a price. Next, click the F1 button on your screen or simply press the F1 key on your keyboard to access the Edit Part Information dialog box. Once the Edit Part Information dialog box is displayed, enter the information for BIN, QTY, NOTES, YTD, INFO, Y1-Y9 HISTORY, AVG COST, MIN, & MAX. Users can navigate from field to field by pressing ENTER, TAB, or by simply clicking the mouse cursor in the appropriate field they wish to access. Once the information has been entered, click the SAVE button to record the information. Users will then be returned to the Enter Part Number to Search field, which will display the part number entered along with all inventory information for that particular part number.
You will need to repeat the above steps for each part number you wish to enter into your inventory.
How do I take a part out of inventory?
Enter the part number into the Enter Part Number to Search field and press Enter. Click the F5 button on the screen or press the F5 key on your keyboard. Clicking or pressing the F5 key DECREASES the QTY field by one and INCREASES the YTD field by one. To remove more than one part from stock, click or press F5 multiple times or use F1 to manually enter the new quantity. In either case, the YTD field will automatically be increased by the amount the QTY field is decreased.
Please NOTE: The Point of Sale Program
available from Huggins Outboard Computer Programs will generate invoices and
decrease stock quantities with each sale made. This is a labor saving
alternative to manually updating the quantity of a part each time one is sold.
How do I return a part to my inventory?
Enter the part number into the Enter Part Number to Search field and press Enter. Click the F6 button on the screen or press the F6 key on your keyboard. Clicking or pressing the F6 key INCREASES the QTY field by one and recalculates the AVG COST field. This is a quick way to add a part to stock. To add more than one part to stock, press F6 multiple times or use F1 to manually enter the new quantity. In either case, the AVG COST field will automatically be recalculated based on the current COST.
How do I delete a part from my inventory?
Enter the part number into the Enter Part Number to Search field and press Enter. Once the information on the part number is displayed, click the F1 option displayed on your screen or press the F1 key on your keyboard to open the Edit Part Information dialog box. Click the “Delete This Part” button located in the lower right hand corner. Additional information on deleting parts is available here.
How do I lookup a part number I don’t stock?
Enter the part number into the Enter
Part Number to Search field and press Enter. The program will search
through the parts price database and return information on the part in the Search Results Field. There are a few rules to follow when
entering part numbers:
You can leave the leading zero off part numbers:
Type: 580148 or 0580148
Part numbers must be exact, one digit off and you get a completely different
part:
Type: 580148, not 580149
You can scan the bar coded UPC from an item using a Bar Code Scanner:
Scan: 745419015923 for 0580148
You can type the 12 digit UPC number to test this capability:
Type: 745419015923 for 0580148
How do I create a new pick list?
Users can create a new Pick List by clicking File\ Start a New Pick List with the Current Part
. Doing so will delete the existing Pick List, and start a new one adding the current part displayed as item 1 on the list. Additional information on creating a Pick List can be found here.How do I add parts to my existing pick list?
If you have already started a Pick List and would like to add more parts to it, simply enter the part number to add in the Enter part number to search field, press ENTER, and then click the F2 button on the screen or press the F2 key on your keyboard.
How do I generate a Low Stock Report?
When you entered your inventory into the system, you had the option of setting a MIN quantity for each part number. This MIN quantity represents the lowest quantity you intend to have in stock. The Huggins System will generate a Low Stock listing that represents all part numbers where the current QTY is less than the MIN quantity. To generate the listing, click the Reports menu and select 1. Purchase Orders \ 1.Low Stock Report. This listing will include all of the parts that have not come in yet, as well as the parts that need to be ordered. Additional information on the Low Stock Report can be found here.
How do I generate a Suggested Reorder Report?
Users can generate a Suggested Reorder Report by pressing CTRL + S on their keyboard or by accessing the Reports menu and selecting 1. Purchase Orders \ 2. Suggested Reorder Report. If the Suggested Reorder Report contains part numbers that you do not wish to order, you will need to adjust the MIN quantity of each part number in question. This can be done by double clicking the part number which will launch the Edit Part Information dialog box. Adjust the MIN quantity and re-run the Suggested Reorder Report. Additional information on the Suggested Reorder Report can be found here.
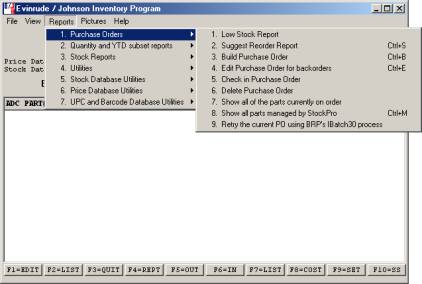
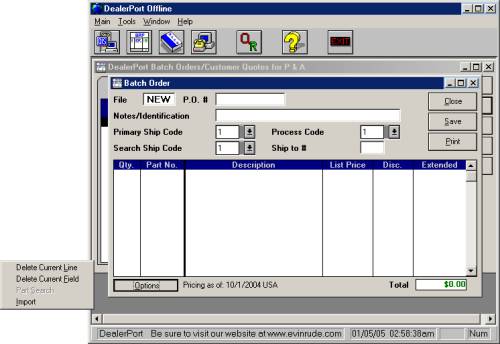
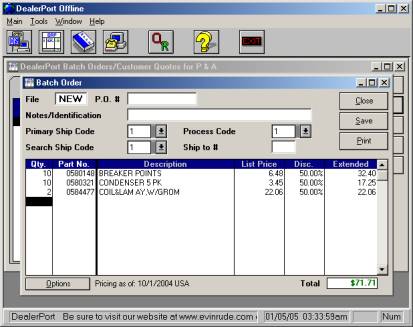
How do I create a Purchase Order?
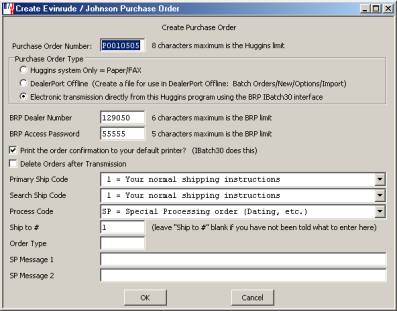
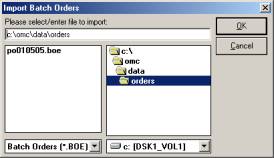
Users are encouraged to generate a Suggested Reorder Report prior to generating a Purchase Order. Once the Suggested Reorder Report reflects the parts you wish to order, Launch the Build Purchase Order report by either pressing CTRL & B on your keyboard, or via the Reports menu – Reports \ 1.Purchase Orders \ 3. Build Purchase Order. When you create your Purchase order, you choose if you want to import and transmit the order with your DealerPort Offline software or use BRP’s Ibatch30 interface. Click here for detailed instructions on this process.
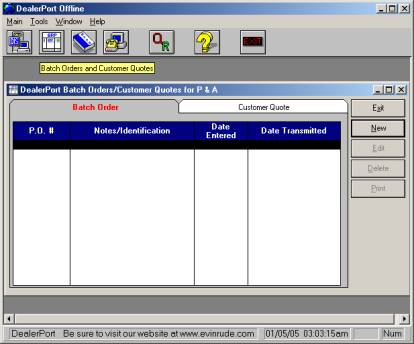
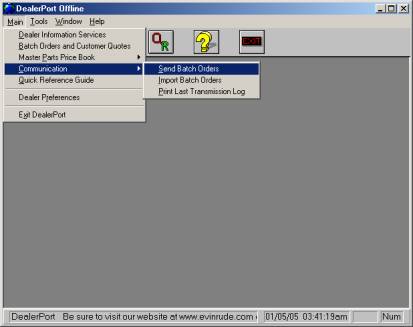
How do I send a send a purchase order created by the Huggins Inventory Program to Evinrude/Johnson via my DealerPort Offline Software?
Purchase orders created by the Huggins Inventory program can be sent to Evinrude/Johnson via your DealerPort communications software. Click here for detailed instructions.
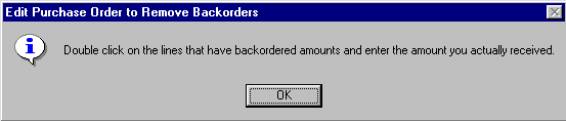
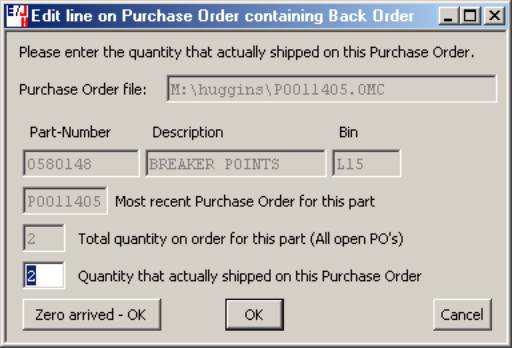
How do I edit a Purchase Order before checking it in?
Dealers often receive orders that are incomplete. This happens when parts are backordered, or shipped from alternate locations. Before checking in a Purchase Order, you will need to edit the Purchase Order to reflect items that are backordered and are not included with the shipment. You will need to access the Edit Purchase Orders for Backorders report. Access this report by pressing CTRL+E on your keyboard, or through the Reports menu by clicking Reports \ 1. Purchase Orders \ 4. Edit Purchase orders for Backorders. Additional information on editing purchase orders can be found here.
How do I check in a Purchase Order?
You can check in Purchase Orders by accessing the Reports menu - Reports \ 1. Purchase Orders \ 5. Check in Purchase Orders. Additional information on checking in orders can be found here.
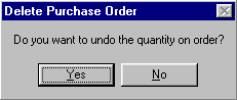
How do I delete a Purchase Order?
You can delete Purchase Orders by accessing the Reports menu - Reports \ 1. Purchase Orders \ 6. Delete Purchase Order. Additional information on deleting orders can be found here.
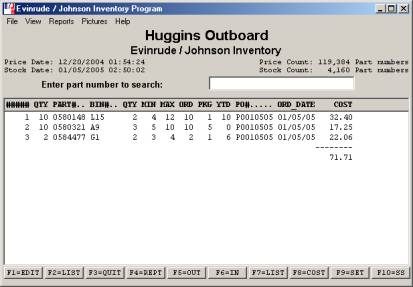
How do I generate a Parts On Order Report
Users can generate the Parts on Order Report by accessing the Reports menu and selecting 1. Purchase Orders \ 7. Parts on Order. Additional information on this report can be found here.
How do I see all of the parts managed by StockPro?
Simply press CTRL + M on your keyboard or click the Reports menu and select 1. Purchase Orders \ 8. Show all parts managed by StockPro. Additional information on this feature can be found here.
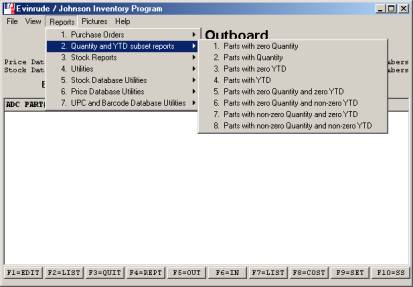
How do I generate a report of all part numbers that I stock, but am currently out of?
Access the Reports menu and select 2. Quantity and YTD subset reports \ 1. Parts with zero Quantity report. Additional information on this report can be found here.
How do I generate a report of all part numbers that I stock and currently have in inventory?
Access the Reports menu and select 2. Quantity and YTD subset reports \ 2. Parts with Quantity report. Additional information on this report can be found here.
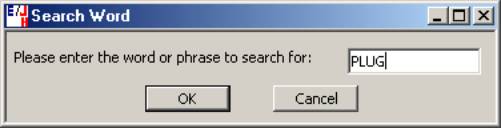
How do I generate a report of all part numbers that I stock, but have not sold this year?
Access the Reports menu and select 2. Quantity and YTD subset reports \ 3. Parts with Zero YTD report. Additional information on this report can be found here.
How do I generate a report of all part numbers that I stock that have had sales activity in the current year?
Access the Reports menu and select 2. Quantity and YTD subset reports \ 4. Parts with YTD report. Additional information on this report can be found here.
How do I generate a report of all part numbers set up in my inventory that I am currently out of, and have had no sales activity for the current year?
Access the Reports menu and select 2. Quantity and YTD subset reports \ 5. Parts with zero Quantity and zero YTD report. Additional information on this report can be found here.
How do I generate a report of all part numbers set up in my inventory that I am currently out of, but have had sales activity for the current year?
Access the Reports menu and select 2. Quantity and YTD subset reports \ 6. Parts with zero Quantity and non-zero YTD report. Additional information on this report can be found here.
How do I generate a report of all part numbers in my inventory that I currently have in stock, but have had no sales activity on for the current year?
Access the Reports menu and select 2. Quantity and YTD subset reports \ 7. Parts with non-zero Quantity and zero YTD report. Additional information on this report can be found here.
How do I generate a report of all part numbers in my inventory that I currently have in stock, and have had sales activity on for the current year?
Access the Reports menu and select 2. Quantity and YTD subset reports \ 8. Parts with non-zero Quantity and non-zero YTD report. Additional information on this report can be found here.
How do I generate a price book of all of my parts?
Access the Reports menu and select 3. Stock Reports \ 1. Price book of all parts in Stock report. Additional information on this report can be found here.
How do I generate a detailed listing of all of my parts?
Access the Reports menu and select 3. Stock Reports \ 2. Pricebook with all Inventory Details report. Additional information on this report can be found here.
How do I generate a listing of the dollar value of my current inventory?
Access the Reports menu and select 3. Stock Reports \ 3. Pricebook showing average cost report. Additional information on this report can be found here.
How do I generate a listing of the Replacement value of my current inventory?
Access the Reports menu and select 3. Stock Reports \ 4. Pricebook showing replacement cost report. Additional information on this report can be found here.
How do I calculate the value of my current inventory?
Access the Reports menu and select 3. Stock Reports \ 5. Calculate value of current inventory report. Additional information on this report can be found here.
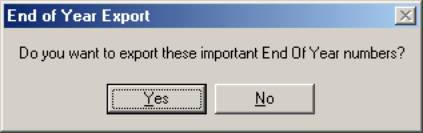
What is Year End processing and how do I do it?
Year End processing is performed on an annual basis to close the current year. Access the Reports menu and select 3. Stock Reports \ 6. End of Year Processing to reset YTD report. Additional information on this report can be found here.
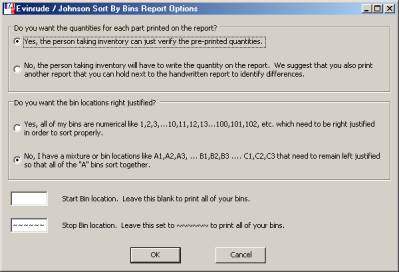
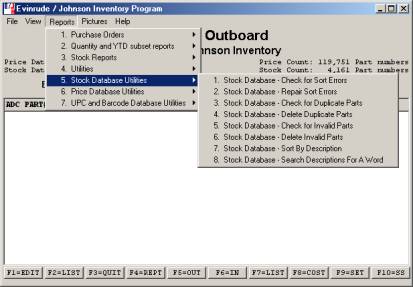
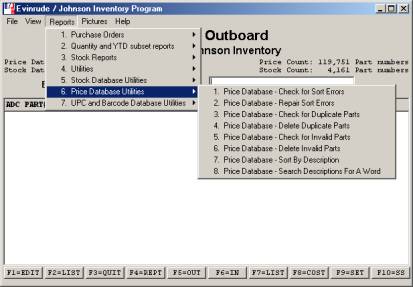
How do I generate a report to take my physical inventory with?
Access the Reports menu and select 3. Stock Reports \ 7. Pricebook sorted by bin location report. Additional information on this report can be found here. We recommend that you print this report once with quantities included, and once without quantities. Provide the personnel taking the physical inventory with the copy that does not include quantities. This will prevent inventory personnel from assuming that the current quantity is correct and skip over small parts or parts that are difficult to count. Have your inventory personnel count and write in the actual quantity for each part number, then use the copy with quantities included to verify proper inventory counts.
How do I set the MIN and MAX quantities on all parts I inventory to the current quantity I have on hand?
Access the Reports menu and select 4. Utilities \ 1.Set all Min’s and Max’s to the current QTY utility. Additional information on this utility can be found here. If you just entered your inventory and you did not enter Min/Max information but you want to keep a perpetual inventory, you need to run this report to initialize your Min/Max settings to maintain your current inventory levels. At any point in the future as you are generating weekly purchase orders, you can tune the Min/Max settings for the parts that you have sold to alter the perpetual inventory calculations. For example, if a re-order was triggered and you do not want to re-order at this time, you can lower the Min setting.
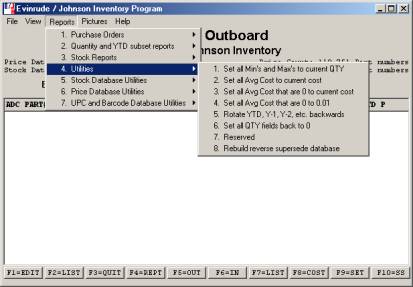
How do I set the Average Cost on all parts I inventory to the current cost?
Access the Reports menu and select 4. Utilities \ 2. Set all Avg Cost to the current cost
utility. Additional information on this utility can be found here.How do I change the Average Cost on parts I inventory that are currently $0.00 to the current cost?
Access the Reports menu and select 4. Utilities \ 3. Set all Avg cost that are 0 to current cost
utility. Additional information on this utility can be found here. This report is useful for cleaning up your inventory before running your end of year report. All parts with $0.00 Average cost are identified as errors. For your accounting numbers to be correct, you need to have an accurate cost for every part in stock.How do I change the Average Cost on parts I inventory that are currently $0.00 to $0.01?
Access the Reports menu and select 4. Utilities \ 4. Set all AVG cost that are 0 to 0.01
utility. Additional information on this utility can be found here. This report is useful for writing off N/A parts that are no longer listed with price information by the manufacturer. The $0.01 value will not increase your inventory cost very much and it will prevent the program from listing the N/A parts as errors.How do I rotate all of my YTD sales history backwards one year?
If users inadvertently run the 3. Stock Reports
\ 6. End of Year Processing to reset YTD report more than once and would like to rotate their YTD sales histories backwards, access the 4. Utilities \ 5. Rotate YTD Y-1, Y-2, etc. Backwards utility. Additional information on this utility can be found here.How do I reset all of my part numbers back to 0 on hand?
If you wish to reset the QTY field for each part number you stock to 0, access the 4. Utilities \ 6. Set all QTY fields back to 0
utility. Additional information on this utility can be found here. This is a drastic step. A physical inventory must be taken after this step in order to get your quantities correct in your computer. A safer step might be to access the Reports menu and select 3. Stock Reports \ 7. Pricebook sorted by bin location report. You can print this report without the quantities showing. You can hire part-time labor to take inventory and write the quantity on the report. Then you can compare the quantiites printed on the report with the amounts listed in the computer.How do I backup my Inventory for safety purposes?
We recommend that you make a backup of your Inventory Data once a week. Click on the “Stockfile Backup” icon in your Huggins Programs group to initiate a backup to your 3.5” floppy disk drive. Additional information on backing up your inventory data can be found here.
How do I contact Huggins Outboard for technical support?
You can contact us by telephone or via e-mail. Click here for our contact information.
Reference Manual
Table of Contents:
Backing up your inventory Data
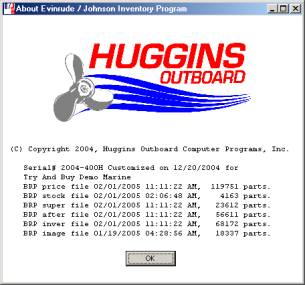
Pricing Information and Time and Date Stamp::
Export
Current Display to Notepad
Start a new
Pick List with Current Part
Details Includes 9 Years History:
Details Includes Min/Max Reorder Line:
2. Suggested Reorder Report: [CTRL + S]
3. Build Purchase Order: [CTRL + B]
Import Your Huggins Purchase Order:
Transmit Your Huggins Purchase Order:
4. Edit Purchase Order for Back Orders: [CTRL + E]
8. Show all parts managed by StockPro: [CTRL + M]
9. Retry the current PO using BRP’s Ibatch30 process
5.
Parts with zero QTY and zero YTD
6.
Parts with zero QTY and non-zero YTD
7.
Parts with non-zero QTY and zero YTD
8.
Parts with non-zero QTY and non-zero YTD
1. Pricebook of all parts in
stock:
2. Pricebook with all
Inventory Details:
3. Pricebook showing
average cost:
4. Pricebook showing
replacement cost:
5. Calculate Value of Current Inventory:
6.
End of Year Processing to reset YTD: (Close Year)
7. Pricebook sorted by
Bin location:
1.
Set all Min’s and Max’s to current QTY
2.
Set all Avg Cost to current cost:
3.
Set all Avg cost that are 0
to current cost:
4.
Set all Avg cost that are 0
to 0.01:
5. Rotate YTD, Y-1, Y-2, etc. backwards
6.
Set all QTY fields back to 0:
7.
Show all parts managed by StockPro
8.
Retry the current PO using BRP’s Ibatch30 process
Users
Guide – Explain common tasks, reports, etc.
Reference
Manual – Explain each menu and button
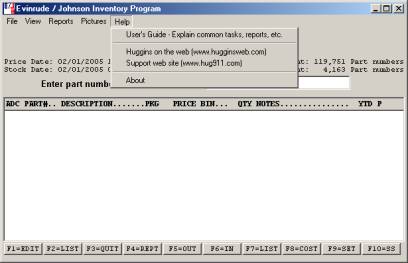
Huggins
on the Web (www.hugginsweb.com)
Support
Web Site (www.hug911.com)
Installation Instructions
New Users: Single User (Single Computer Configuration)
Huggins Outboard Computer Programs provides software on computer CD-ROM disks. Our goal is to make the installation process as simple as possible for you! To install your Inventory Program simply insert your CD-ROM into your CD-ROM drive. The installation program should start automatically in less than 30 seconds. In the event that your computer does not recognize the automatic installation utility on your CD-ROM, simply click START, RUN and type D:\SETUP to launch the installation process. You may need to substitute your CD-ROM drive letter if it is different than D:\ . Once the installation begins, simply follow the on-screen instructions to complete the installation.
Please Note: The default (standard) installation
location for your Huggins software is in the C:\Huggins folder. We encourage
all users to load the software in this location to simplify installation of
future price updates, program upgrades, and to insure the functionality with
existing Huggins software as well as software provided by other companies that
is compatible with the Huggins System.
If you or your system administrator choose to load the software in a
different location on your computer system, please contact Huggins Outboard
Computer Programs and advise us as to the installation location of your Huggins
System so that we can update your customer records for future reference.
New Users: Network User (Multiple Computer Configurations)
The Huggins Inventory Control Program is available in a network compatible version. If you purchased a network version, your installation CD will present you with two installation buttons. One of the buttons is used to install the software on your “server” computer, and the other button is used to install the software on your “client” computers. After clicking the proper button for your installation, simply follow the on-screen instructions to complete the installation.
Please Note: The default installation location for
“client” computers in a network environment requires the use of a mapped H:\Huggins
drive letter. Your network administrator should have client computers
pre-configured with an H:\Huggins drive prior to installation of the Huggins
Inventory Control Program. If you will be doing a network installation of the PartSmart software, you can simplify your installation and
network setup by installing Huggins and PartSmart on
the same shared hard drive.
Your network performance will depend on the performance of your network as well as the computers involved. A slow server will slow access for everyone. A slow network will slow access for everyone. A slow client will slow access for this one computer only. If the speed of the reports, such as the F7 parts list or the Suggest Reorder report, needs improving, ensure that all of your ethernet components are 100M. A 100M switch or router to connect your computers is needed for optimal performance. 10M Ethernet can be a bottleneck when accessing information across a network. Network performance is excellent with 100M ethernet with Windows98, WindowsME, Windows2000, WindowsXP Home, and WindowsXP Pro. When choosing a server for your network, keep in mind that WindowsXP Home has a 5 user limit. If you choose WindowsXP Home as your server, you can connect only 5 additional computers that will access the Huggins shared inventory information. Do not overlook the possability of using an older slower machine as a file server. The file server requirements are such that any computer manufactured after the year 2000 has the capacity to function as a file server. Anyone setting up a network today should consider using a Network Attached Storage device instead of a Windows machine operating as their File Server. The cost is less and the upkeep is less.
Network Attached Storage:
An alternative network install using a Network Attached Storage device in place of a file server is possible. In this case, you simply indicate the H:\Huggins drive letter on your “server” install. You also indicate H:\Huggins on the “client” install. A Network Attached Storage device is a small computer accessory that allows all of the computers on your netowrk to share a common harddrive. The harddrive in the NAS device is not dependent on Windows Updates, Anti-Virus updates, Anti-Spam updates, etc. It is a low maintanance, high performance file server. The NAS device plugs into 110V power (you should use a battery backup device) and it plugs into your ethernet. Some administration is required, but it is less than is required for a Windows machine. For example, you will need to setup the user names that login to your client computers. You would allow these users to access a share on the NAS that contains a Huggins folder. The clients would link to the share as the H: drive. This allows the clients to access H:\Huggins in the standard way.
Configure your PartSmart program for use with the Huggins Inventory program
Evinrude/Johnson dealers who use the PartSmart software from ARI can access their Huggins inventory information directly from the PartSmart interface. Dealers find this useful since they see their bin location, quantity on hand and selling price right on the PartSmart screen. Particullary useful is the supersede chaining that takes place in the Huggins software. If the part number you are searching in PartSmart is in stock under a newer number, you will see an indicator in the BIN location field for the part number that you are searching for. This way, you do not need to check every part number in the supersede chain inside PartSmart. You will know if you stock the replacement part the first time.
PartSmart Lookup with View List Price Selected
To configure your PartSmart software for use with the Huggins Inventory Program, launch PartSmart by clicking on a desktop icon or by clicking Start \ Programs \ Parts Lookup \ PartSmart. Click on the Utilities button and you will see a Utilities window. Click on the “Configure PartSmart” button and you will see a “Configuration” window. On the “Paths” tab that this window starts in, you will see a slot for “BSV Link”. BSV stands for Business System Vendor. In this case, Huggins Outboard is providing your business system. Enter “C:\Huggins\hug_psmt.exe”. This is the program that PartSmart calls for all lookups into the Huggins system. In a network environment or a Network Attached Storage environment, you would enter “H:\Huggins Outboard hug_psmt.exe”. Click “OK” to close the “Configuration” window and then click “Close” to close the “Utilities Menu”. Now you are ready to lookup parts in your linked PartSmart/Huggins system.
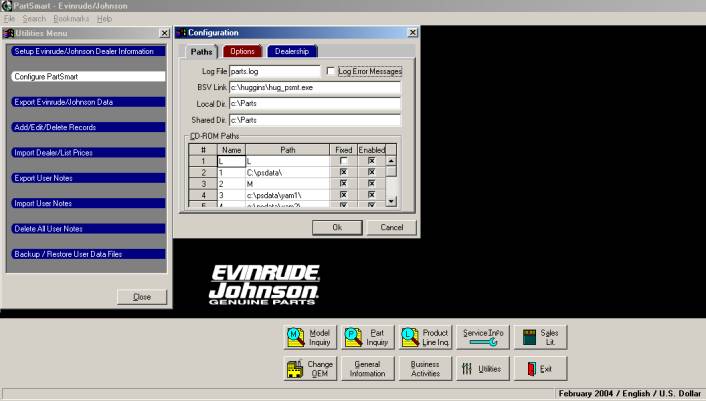
PartSmart Configuration Window
Huggins Inventory Information for part number 580416
Backing up your inventory Data
Backing up your inventory data is a critical step in maintaining your computer system. After you have entered your inventory and begun using the system, your inventory data will have a tremendous value based on the labor involved in entering it into your system. Each and everyday that you use your computer the value of your inventory data becomes even more valuable. Imagine how you would feel if your computer was stolen, or your harddrive failed and you had to start over from scratch with no inventory backup. Please – Take a few moments and create a backup policy for your dealership, and appoint an individual to perform the backup.
Dealers often ask us – “How often should I be doing a backup”? There is no simple answer. At a minimum, users should backup their data once a week. Some users choose to perform backups more frequently, and unfortunately, some users choose to do them less frequently. Just remember, In the event of a harddrive failure which would force the restoration of your last backup, the data will only be as current as the last time you performed a backup.
We have included a simple to use, fast backup program that will allow you to backup your inventory data to your floppy disk drive. Most users will discover that it takes less than 30 seconds to backup all of your inventory data! As time goes by and your inventory grows, the backup program will prompt you to “Insert Disk 2” should the file size exceed the capacity of a single floppy diskette! Considering the value of your inventory data and the time required performing a daily backup, why would you not implement and enforce a backup policy?
To perform a backup of your Inventory Data, perform the following:
· Make sure all users have “closed” the Huggins Inventory Program on all computers.
· Insert an empty floppy disk into your floppy disk drive (A:).
· Double click the “Stockfile Backup” icon located in your Huggins Programs folder.
· Be sure the empty diskette is in your floppy drive and press any key on your keyboard to begin the backup.
· Once completed, you will be presented with a screen showing the allstock.zip file and the time and date of backup.
· Write the time and date you see on the computer screen on the sticker on the floppy diskette.
· Press any key to return to your desktop.
You have successfully backup up your inventory data! Be sure and store your backup diskettes in a safe and secure location. It’s also good idea to always keep a copy of your backup at a location other than your business in the event of a flood or fire.
Please Note: The backup procedure described above
backs up your Inventory Data only. If you have a ZIP drive or some other form
of removable media and wish to backup your entire Huggins System including
Inventory Data, Program Files, etc., Please consult with your network
administrator or contact us for alternate
backup configurations.
Backup Strategy
Using the same diskette to backup your inventory week after week is not a good idea. One problem is that the diskette will get used 52 times a year and will eventually wear out from repeated use. Another problem is that your inventory could become partially damaged and you might backup the damaged inventory before you notice the damage. If you are using a single diskette for backup, you have a single point of failure. A better strategy involves rotating a box of 10 diskettes in the following pattern:
Disk 1 can be used for your first monthly backup. Disk 2 can be used for your first weekly backup. Disks 3-10 can be rotated for daily or weekly backups. At the end of the week, use the next disk up for rotation as the new weekly backup. Put the old weekly backup in the back of the rotation. Same thing for the end of the month. Use the next disk up for rotation as the new monthly backup. Put the old monthly backup in the back of the rotation. This way, if a problem causes your inventory to become partially damaged, you might not notice the problem for a few days; but when you do notice the problem, you will have several chances to find a good backup.
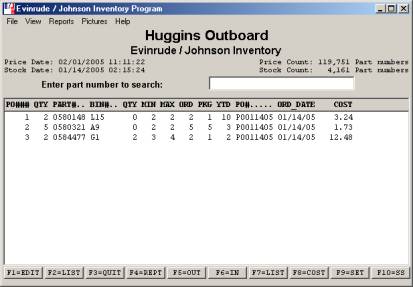
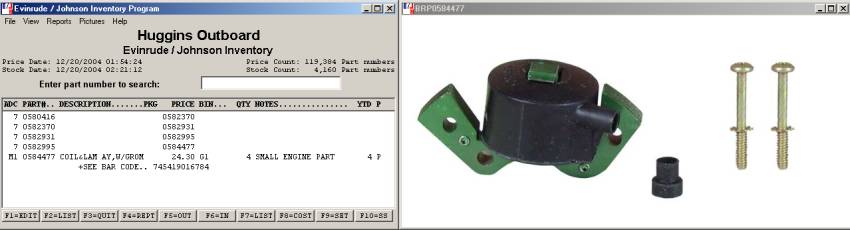
Part Number Search Screen

Part Number Search Screen (No Part Number has been entered.)
The first screen you see when you start the Inventory Program is the Part Number Search Screen. Let's cover this screen from the top down.
The blue title bar displayed at the top of the window displays the Program icon and the program name “Evinrude / Johnson Inventory Program”.
Please Note: The icon shown will be displayed in
your windows task bar when the program is minimized.
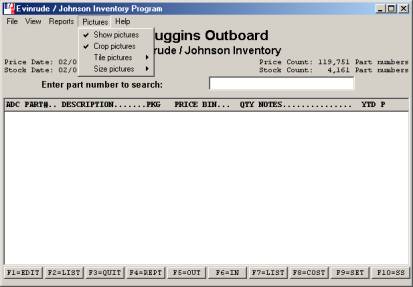
The command line is displayed next and contains drop down menus for the following functions: FILE, VIEW, REPORTS, PICTURES, and HELP. The drop down menu’s can be accessed by clicking on the command or via your keyboard using ALT-F, ALT-V, ALT-R, ALT-P, and ALT-H keystrokes. The functions associated with each of these menus are covered in detail later in this document.
The first line contains your dealership name. This name has been set up in the program for you. Should you ever need to change this name, just give us a call and we can help you.
The second line contains the name of the program: Evinrude / Johnson Inventory.
The third line prompts the user to “Enter Part Number to Search” This is where you enter part numbers to obtain information.
The forth Line is called the “Heading” line. The heading line contains abbreviations and descriptive titles for the fields that are contained in the price file from BRP and the stock file that the Huggins System creates for you. The Headings are as follows:
A = Availability Code (Captive Indicator)
“*” = BRP is your sole source for this part.
“ ” = This is a competitive part, (i.e. there are aftermarket manufacturers).
D = Discount Code
Depending on your dealer type, this determines the discount for captive parts. For competitive parts, all dealer types get the full discount.
CODE
FULL PACKAGE PAC
---- ---- ------- ---
A
10% 8% 6%
B 20% 17% 12%
C 25% 22% 15%
D 30% 26% 19%
E 32% 28% 20%
F 33% 29% 21%
G 36% 31% 22%
40% 35% 25%
H 40% 35% 25%
J 43% 37% 27%
K 45% 39% 28%
L 46% 40% 29%
M 50% 44% 31%
N 55% 48% 34%
O 60% 52% 37%
P 67% 58% 42%
Q 49% 49% 49%
R 70% 61% 44%
S 0%
0% 0%
T 0%
0% 0%
X 0%
0% 0%
C = Stock Activity Code (Movement Indicator)
1 Most active part. Should be considered as regular stock item.
2 Fast moving part. Should be considered as regular stock item for most dealers.
3 Less active part. Should be stocked according to demand.
4 Slow moving part. Order only as needed.
5 Very slow moving part. Order only as needed.
6 For special order only.
7 OBSOLETE, NOT AVAILABLE, NOT RETURNABLE.
PART Number Field:
The PART Number field contains the part number you searched for. If you ever get unexpected results, check this field to see if the part number is correct.
DESCRIPTION Field:
The DESCRIPTION field contains the 18 character description provided by BRP on the price diskettes. If the description says “SEE PRICEBOOK”, then there will be some notes in the description field of the paper copy of the price book. In many cases, we have entered this information into our databases, and we can show you this information on the screen. This information is not as structured as the price file updates, and we do not get regularly scheduled deliveries of this information from BRP.
PKG Field:
This is the package quantity for this part. For example, say it is 5. If you buy less than 5, you will receive 5. If you buy 6, you will get 10. Your order will always be rounded up to the next highest multiple of 5.
PRICE Field:
The PRICE field indicates the “dealership list price.” If you are using a custom price formula, this is your list price using your formula. If the part number you entered has been superseded or is no longer available, this information is displayed in this field just like the paper copy of the price book does.
BIN Field:
The BIN field identifies the 6 character stock room location of a part you stock. You must enter this information for each part in your inventory; otherwise the field appears blank.
QTY Field:
The QTY field identifies the current quantity on hand for the part searched. Quantity will only be present for parts in your stock file.
NOTES Field:
The NOTES field provides a 20 character notes field that you can use for any purpose you want. Some suggested uses are: additional bin locations, keeping up with used parts, cross referencing parts with kits or assemblies that include this part number, cross referencing alternative sources for this part, customer name and phone# for special orders, and backorder information. This field is blank until you type in the notes you want.
YTD Field
The YTD or Year-To-Date field gives the quantity sold of this part number thus far this year. As the quantity field is decreased, the YTD field is increased automatically. YTD applies only to parts that are in your stock file. At the end of each year, there is a special report that you should run which moves the YTD counts for each part into the history area for that part. Detailed instructions for running this report can be found in the Stock Reports section.
Search Results Field:
The white space in the center of the program screen will display the results for the part number searched.
Function Keys:
The bottom of the program window contains a series of buttons that correspond to the following functions.
F1=Edit
Clicking the F1 button on the screen or pressing the F1 key on your keyboard will open the Edit Part Number dialog box as pictured here.
F2=List
Clicking the F2 button on the screen or pressing the F2 key on your keyboard will add the current part number to the pick list in progress. For instructions on starting a new pick list, click here.
F3=Quit
Clicking the F3 button on the screen or pressing the F3 key on your keyboard exits the program.
F4=Reports
Clicking the F4 button on the screen or pressing the F4 key on your keyboard opens the Reports Menu pictured here.
F5=OUT
Clicking the F5 button on the screen or pressing the F5 key on your keyboard decreases the QTY field by one and increases the YTD field by one. This is a quick way to remove a part from stock. To remove more than one part from stock, you can click or press F5 more than once or you can use F1=EDIT to manually enter the new quantity. In either case, the YTD field is automatically increased by the amount the QTY is decreased.
Please Note: If you are not sure if you pressed
[F5] or not, you can check the TIME & DATE stamp by pushing [F8] to enter
DETAILS mode. If the TIME & DATE are current, then you did push [F5]. If
you are not sure if you accidentally pushed F5 twice, you will have to check a
recent inventory report or just go count the parts in the BIN. To avoid this
trouble, always remember what the quantity field was to start with and double
check when you are finished to make sure it has been decreased the proper
amount. You are allowed to decrease the
quantity field down past 0 into the negative numbers. This is to allow you to sell a part you do
not have (off of a new engine, from a larger subassembly, or from its component
parts) and later make your counts come out right when your parts order comes in
and you replace the robbed part. The [F5] key updates the TIME & DATE stamp
in the part record as does any change to the part record.
Please Note: The Point of Sale Program available
from Huggins Outboard Computer Programs will generate invoices and decrease
stock quantities with each sale made. This is a good alternative to manually
updating the quantity of a part each time one is sold.
Please Note: The F5 OUT key can be password
protected in order to prevent unauthorized users from removing parts from your inventory.
Additional details on setting up this security feature can be found here.
F6=IN
Clicking the F6 button on the screen or pressing the F6 key on your keyboard increases the QTY field by one and recalculates the AVG COST field. This is a quick way to add a part to stock. To add more than one part to stock, you could press or click F6 more than once or you could use F1=EDIT to manually enter the new quantity. In either case, the AVG COST field will automatically be recalculated based on the current cost. Clicking or pressing the F6 key updates the TIME & DATE stamp in the part record, as does any change to the part record.
F7=List
Clicking the F7 button on the screen or pressing the F7 key on your keyboard will produce a listing of your entire parts inventory in numerical part number order. This listing can then be referenced by the user, printed, or exported to Notepad. Your can double click on any of the lines in this display to edit the part information. This report is a live report in that any changes you make to the edit screen will be visible in the F7 listing immediately. Please make note of the usefulness of this listing in maintaining your inventory. You or your parts manager will use this list to keep your inventory information accurate.
F8=COST
Clicking the F8 Button on the screen or pressing the F8 key on your keyboard turns the Details view on or off. Users can select which fields are displayed with details turned on by setting the options in the View menu.
Please Note: The default setting for your software
is Details off. Users may wish to have the details turned on each time they
start the program. Click here for information
on how to have details on each time you start your program.
F9=Setup
Clicking the F9 button on the screen or pressing the F9 key on your keyboard will launch the program setup options. Click here for additional information on program setup options.
F10=SS (supersede)
Clicking the F10 button on the screen or pressing the F10 key on your keyboard allows you to bump down the supersede chain one part number at a time. Each time you press F10, you will drill down 1 level through the supercede chain. This feature can be a big time saver if you are using an older service manual or microfiche library that contains older part numbers which have since been superceded. A sample BRP part number to lookup to experiment with this feature is 281183. This is a remote control that has been superseded many times through the years. Pressing F10 will move down the supersede list one supersede at a time.
Detail Fields

Part Number Search Screen with
Details turned on
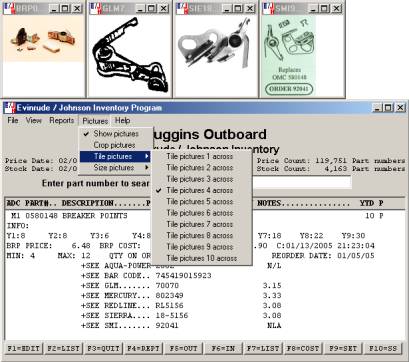
There are four additional lines of information that can be selectively displayed that are referred to as DETAILS. You can see these fields only when F8=Cost is selected. These details can be turned on or off by clicking the F8 button on your screen, pressing the F8 key on your keyboard, or by clicking the View menu and selecting Show Details.
INFO:
The first detail line is an information line similar to the notes line with the exception that it has room for much more information. The Info line is not displayed when details are turned off.
YTD History
The second detail line contains the year to date history for the last nine years. The Y1 field contains the year to date count for last year. The Y2 field contains the year to date count for 2 years ago, etc. In order to maintain accurate YTD parts counts, you must “close” your year on an annual basis. Click here for additional information on closing the year.
Pricing Information and Time and Date Stamp:
The third detail line contains the pricing information for the part, as well as a time and date stamp which indicates the last time the part record was changed. If you are using a custom price formula, the BRP PRICE displayed will be different from the LIST PRICE displayed. The BRP PRICE is the suggested list price (the one printed in the paper copy of the price book.) The LIST PRICE displayed will be your selling price. The BRP COST is your cost for this part, and is used in calculating the AVG COST for accounting purposes. The time and date stamp indicates when this part’s record was last changed. Note that the cost part is calculated from the list price using a formula that depends on your dealer type as well as the discount code for this part.
Min \ Max \ Qty on Order \ PO \ Order Date
Information:
The fourth detail line contains the Min, Max, Qty on Order, PO#, and Order Date fields and are used to maintain inventory.
Part Numbers Not Found
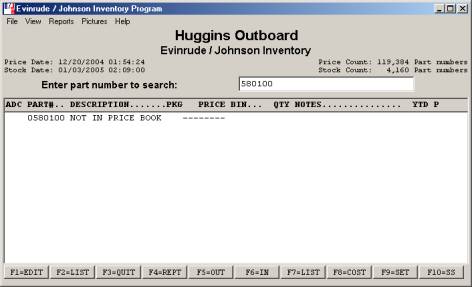
The “NOT IN PRICE BOOK” menu screen
In the event that a user enters a part number that the system does not recognize as a valid part number, the system will present the NOT IN PRICE BOOK screen as pictured above. You can add this part to BRP’s price file and/or enter inventory information for this part number by pressing F1.
File Menu
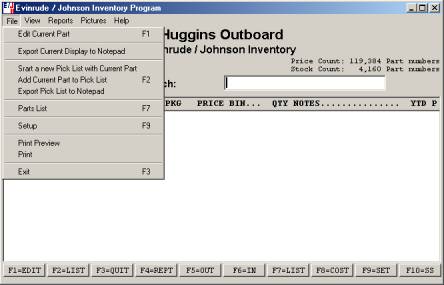
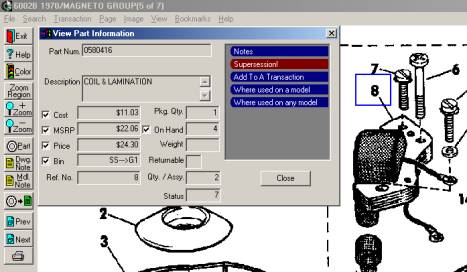
Edit Current Part: [F1]
In order to use the system for inventory control, you must provide the system with information on the parts you inventory. You enter a part number, and then edit the information associated with that part number. (see picture below)
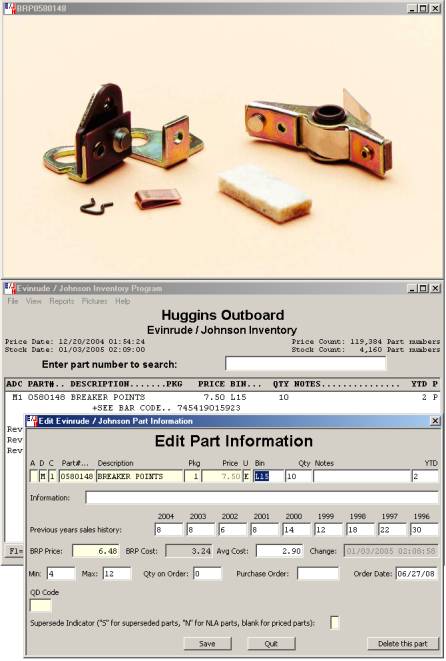
Edit Part Number Dialog
Users will typically fill in existing inventory information in the white fields pictured above. They are as follows:
Bin:
6 Character address of where parts are located in your stockroom. Example: A13
Qty:
The current quantity on hand. Example: 6
Notes:
A 20-character field for information you wish to see when researching the part number with details turned off.
YTD:
The number of this part number sold this year.
Info:
A 75 character field for information you wish to see when researching the part number with details turned on. Example 1: “There are more of these in the storage trailer”. Example 2: You could enter your customer’s mailing address for a special order part.
Previous years sales history:
The number of parts sold for the year indicated. Users may wish to input this information if they have it available. If not, the system will automatically record this information each year when you close your YTD sales. Note that the system uses your computer’s clock to calculate the years for the past 9 years. To maintain your inventory properly, you will need to run the “end of year” report promptly each year around January 1st.
BRP Price:
The current list price of the part as published by Bombardier Recreational Products (the makers of Evinrude/Johnson engines). (Your retail may differ if you are using custom pricing.)
BRP Cost:
The current cost price as published by Bombardier Recreational Products (the makers of Evinrude/Johnson engines).
Avg Cost:
The average cost for the part number. Average cost are computed by the quantity on hand and the amount paid for each one. In most cases, after you have been using the system for several years, the average cost for items in stock will be lower than the current BRP cost. This is a result of inflation of cost prices over time. This is a good thing since you pay inventory taxes on this lower value.
Change:
This field indicates the last date and time there was activity on the part number.
Min:
The Minimum stocking quantity you wish to maintain. Example: We never want to have less than Min on hand.
Max:
The Maximum stocking quantity you wish to maintain. Example: We never want to have more than Max on hand.
Qty on Order:
The quantity that is currently on order. If you use your Huggins System to produce purchase orders, the quantity on order will be displayed here.
Purchase Order Number:
The purchase order number that contains this part number. If you use your Huggins System to produce purchase orders, the purchase order number will be displayed here.
Order Date:
The date of the purchase order that contains this part number. If you use your Huggins system to produce purchase orders, the purchase order date will be displayed here. This date is maintained even after the purchase order has arrived and processed. This date is intentionally kept around as a historical marker of the last reorder.
Save Button
Once you have entered the relevant information for the part number, click on Save to retain the information entered. To abandon any changes you have made, click on Quit.
Delete This Part
If you wish to delete all quantity on hand and historical information on this part number, click on the Delete this part button. You will be presented with the following warning dialog:
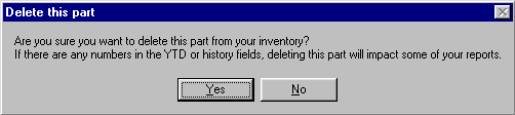
Choose Yes or No keeping in mind that your inventory totals will be adjusted accordingly. For example, if you have special ordered a $100 starter one time each year for each of the past 5 years, and each time you create a inventory record for the order, then delete the inventory record after the customer picks up the part, you will not see this historical information. You might need to stock this starter to support your service operations or for future over the counter sales. Whenever you delete a part record, you lose any historical information about your use of this part.
Export Current Display to Notepad
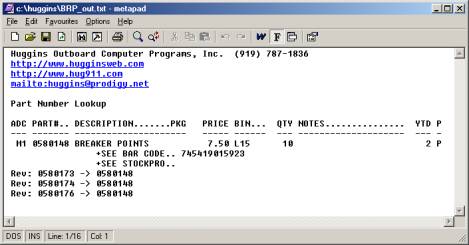
Sample of
Search Results exported to Notepad
Clicking
on this option will export the data contained in the search results field to
the Notepad application included with your windows operating system. From
notepad, the information can then be saved or printed depending on your
requirements. The Huggins program saves
the file as brp_out.txt in your huggins
folder each time you do an export. You
can always retrieve the most recent export be opening this file. If you want to save an export for access
later, you need to save it to a different name.
The brp_out.txt file will get overwritten with each new export.
Start A New Pick List with Current Part
Clicking on this option will create a new pick list starting with the part number selected. Once selected, you will be presented with the following dialog box:
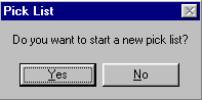
Select Yes to create a new pick list or No to cancel the operation.
Add Current Part to Pick list
Clicking on this option will add the selected part to a pick list that has already been started.
Export Pick List to Notepad

A 3 item pick list created with details turned off
Clicking on this option will export the pick list to the notepad application supplied with your operating system. Once exported, the pick list can be saved as a file or printed depending on your requirements.
Please Note: When creating pick lists, your pick list will reflect detailed data for each part if you have F8 Cost (details) turned on!
Parts List [F7]
Clicking this option will generate a complete Parts List for all parts currently set up in your system. The parts will be sorted by part number and displayed in the search results screen of your program. If you wish to print or save this parts list, click FILE and PRINT or EXPORT CURRENT DISPLAY TO NOTEPAD. Your can double click on any of the lines in this display to edit the part information. This report is a live report in that any changes you make to the edit screen will be visible in the F7 listing immediately. Please make note of the usefulness of this listing in maintaining your inventory. You or your parts manager will use this list to keep your inventory information accurate.
Setup [F9]
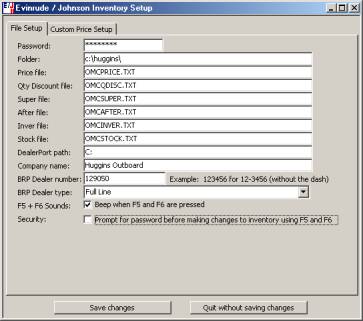
Setup Screen
The setup screen is accessed by clicking FILE, SETUP or by pressing the F9 key on your keyboard. Please note that these settings should only be modified by management personnel. For security purposes, these screens are PASSWORD protected and can only be modified by users who have the system PASSWORD.
WARNING: Changes to the settings on the setup screens can have drastic effects on your inventory files. DO NOT make any changes to these settings without first backing up your system. Failure to do so could result in losing your inventory information!
In order to make changes to the system settings, authorized users must first enter the proper PASSWORD. The program will not allow users to advance until the proper PASSWORD has been entered. If you wish to change your system PASSWORD, please perform the following:
Backup your System
Enter the current system PASSWORD
Click in the PASSWORD FIELD
Type your new PASSWORD – Note: For security purposes, you will only see asterisks displayed.
Click SAVE CHANGES at the bottom of your screen.
Store your PASSWORD in a secure location for future reference.
If you are attempting to access the setup screen and have lost or forgotten your system password, please contact Huggins Outboard Computer Programs at 919-787-1836.
Some of the setup fields apply to both the old DOS system and the new Windows system. Some users will be using both systems in parallel until they have upgraded all of their computers to pentium level computers to run the Windows version. Until then, only changes made in the Windows F9 setup screen effect both the DOS and windows versions. Changes made in the DOS F9 setup screen effect only the DOS system.
Setup Fields – File Setup
Password:
By default, the password is PASSWORD; but please do not tell anyone.
Folder:
Path name for the root of your Huggins System (Do Not Modify unless instructed to do so by Huggins Technical Support.)
For single user installations, this should be “C:\Huggins”.
For network installations, this is normally “H:\Huggins”.
Price file:
System price file name (Do Not Modify unless instructed to do so by Huggins Technical Support.)
Quantity Discount file:
Table of quantity breaks and discounts (Do Not Modify unless instructed to do so by Huggins Technical Support.)
Super file:
System supersede filename (Do Not Modify unless instructed to do so by Huggins Technical Support.)
After file:
System aftermarket file name (Do Not Modify unless instructed to do so by Huggins Technical Support.)
Inver file:
System inver file name (Do Not Modify unless instructed to do so by Huggins Technical Support.)
Stock file:
System stock file name (Do Not Modify unless instructed to do so by Huggins Technical Support.)
DealerPort path:
Defines the drive volume for DealerPort Offline. (Do Not Modify unless instructed to do so by Huggins Technical Support.) For single user installations or network installations with multiple independent installations of DealerPort, this should be “C:”. For Huggins network installations with DealerPort network installations on the same file server, this is normally “H:”.
Company Name:
Enter your company name here.
BRP Dealer Number:
Your BRP Dealer Number without the dash. Example: Your dealer Number is 12-9050 – Enter 129050 as your dealer number. If you are not an authorized BRP Dealer, please leave this field blank.
BRP Dealer Type:
Your BRP Dealer type. Example:
If you are a Full Line dealer, please select “Full Line”. If you are a package dealer, please select
“Package Dealer”. If you are not an
authorized BRP Dealer, please select
F5 + F6 Sounds:
Turns “Beep” on or off when users use the F5 key to remove inventory from the system or F6 to add inventory to the system.
Security:
Activating this security feature will require all users to enter the system PASSWORD when adding or deleting inventory from the system using the F5 or F6 keys.
Setup Fields - Custom Price Setup
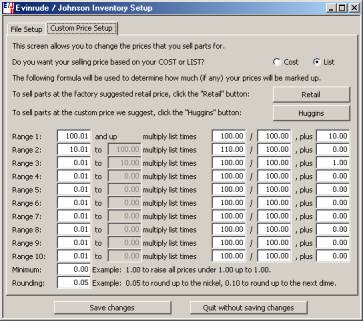
Custom Price Setup Screen
The Custom Price Setup screen allows you to enter your price ranges, percentages, and fixed increases the way that makes sense for your business! Note that the formula lets you change the numerator and the denominator of the percentage fraction. To add 10% markup, for example, you would make the fraction 110/100. To build in a 10% discount, make the fraction 100/90. The fixed increase is a useful part of the formula allowing you to add a fixed amount to lower priced parts (or all parts for that matter) to cover your inventory overhead. For higher priced parts, this fixed increase can be used to cover UPS postage in case it is a special order or in case you have to reship the part somewhere else.
Do you want your selling price to be
based on COST or LIST:
Select which method you wish to use for custom pricing. The default setting is LIST.
To sell your parts at the published list price, simply click on the Retail button and then click the Save Changes button. This is the default setting when your software is installed.
If you wish to use the “Huggins” formula, simply click on the Huggins button and then click the Save Changes button. The Huggins formula is detailed here.
Range 1 through Range 10
The Range fields allow users to create their own price ranges for applying custom pricing if they choose to do so. Simply enter the beginning dollar amount and then the ending dollar amount to create a price range. The program supports up to 10 custom price ranges should your markup strategy require them.
Please Note: Users of the Huggins Accessory Program will need to duplicate custom formulas used in this program within the Huggins Accessory Program for the BRP vendor. Please refer to your Huggins Accessory Program Users Guide or contact us if you need assistance with duplicating the custom price formula in the Huggins Accessory Program.
Minimum: This field allows users to set a Minimum selling price for all parts. Example: If $1.00 is set as the minimum selling price, a part with a suggest list of .85 will automatically be marked up to $1.00.
Please Note: You DO NOT have to use custom pricing
in order to utilize this feature. Simply set your minimum selling price and all
parts with a suggest list price less than you minimum selling price will be
marked up to your minimum selling price!
Rounding: Setting an amount in this filed will automatically round all prices to end in this number. With Rounding set to 0.05, a part with a published list price of $32.57 will me marked up to $32.60
Please Note: You Do NOT have to use custom pricing in order to utilize this feature. Simply set the rounding figure and all part prices will be rounded to this number!
There are several possible ways to increase your profit selling parts:
1. Establish a dealership minimum price (Example: Dealership minimum of .95)
2. Use a custom price formula based on LIST price
A. Across the board (Example: All prices 10% above LIST price)
B. Interval based strategy
This is an example of
the Huggins method, which can be invoked by simply clicking on the
Huggins button.
100.01 – UP :
0.0% + $10.00
10.01 - 100.00 : 10.0%
0.01 - 10.00 : 0.0%
+ $ 1.00
EXAMPLE 2
100.01 - UP :
5.0%
20.01 - 100.00 : 10.0%
10.01 - 20.00
: 15.0%
5.01 - 10.00 : 20.0%
.01 - 5.00 : 25.0%
3. Use a
custom price formula based on COST price
A. Across the board (Example: All prices 100% above COST price)
B. Based entirely on COST ranges
100.01 - UP
: 66.0%
10.01 - 100.00
: 75.0%
.01 - 10.00 : 100.0%
View Menu
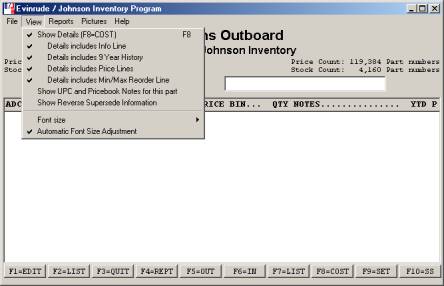
Show Details [F8]
Users can activate the “Details” cost view by clicking this option or by simply pressing the F8 key on their keyboard.
Please Note: Users can customize which fields are displayed with the “Details” view in use. Options that are turned on are indicated with a check mark to their left.
Details Includes Info Line:
Activate or deactivate this option if you want the Info line displayed when details are turned on. The default setting is on.
Details Includes 9 Year History:
Activate or deactivate this option if you want your previous YTD sales numbers displayed when details are turned on. The default setting is on.
Details Include Price Lines:
Activate or deactivate this option if you want List Price, Cost Price, and Average Cost fields displayed when details are turned on. The default setting is on.
Details Includes Min/Max Reorder Line:
Activate or deactivate this option if you want you MIN and MAX quantities displayed when details are turned on. The default setting is on.
Show UPC and Pricebook Notes:
Activate or deactivate this option to display aftermarket products, which are compatible with the part number researched. The default setting is on.
Show Reverse SS:
Activate or deactivate this option to display reverse supersession of the part number researched.